Overview
The internal programming (firmware) of the Scan Module, may require periodic updates.
Symptoms
Firmware updates increase the Scan Module’s diagnostic capabilities, typically by adding support for new tests, vehicles and enhanced applications to the vehicle databases. Scan Module firmware updates (when available) are delivered with diagnostic software updates/ upgrades. Upon starting the Scanner function, initially after a software update or upgrade has been installed, a message may be displayed to inform you an update is available.
The firmware update process, as explained in the following procedure, begins automatically after ten seconds unless Update Now or Update Later is selected. Selecting Update Now begins the process immediately. Update Later defers the operation, closes the message, and starts the Scanner function. If you choose not to perform the update, it will not affect diagnostic tool operation, however you will not benefit from the additional features available in the update. Selecting Details in the upper-right corner opens a list of what is included in the update.
Resolution
IMPORTANT: The diagnostic tool must be connected and powered by the AC/DC power supply during the Scan Module firmware update process. Damage can occur to the Scan Module if the diagnostic tool power is turned off or the power supply is disconnected during the firmware update process.
1. Connect the AC/DC power supply to the diagnostic tool.
2. Turn on the diagnostic tool.
3. Connect the Scan Module to the diagnostic tool as follows
- From the bottom of the Scan Module, gently lift up and out on the sides of the handgrip to free it from the housing.
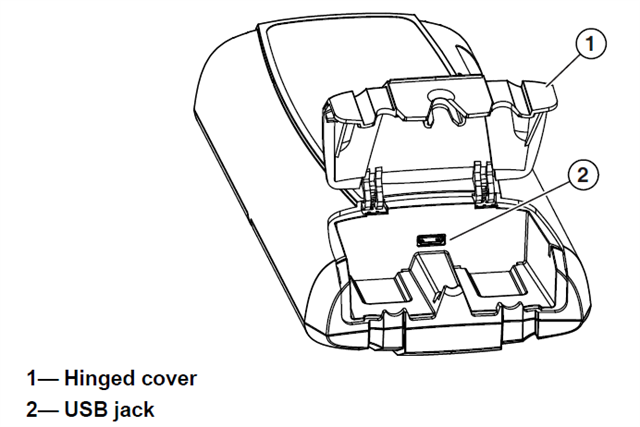
- Open the hinged cover on the base of the Scan Module to expose the USB jack.
- Plug the small end of the USB cable into the USB jack on the Scan Module.
- Plug the large end of the USB cable into one of the USB jacks on the side of the diagnostic tool
NOTE: The Scan Module and diagnostic tool must be connected with the USB cable during the update
process. The Scan Module DLC must be disconnected from a vehicle during the update process.
NOTE: When connected, the scan module USB connection status icon background color will change from gray to green.
4. Select Scanner from the diagnostic tool Home screen.
5. Select OK when the update available message displays. The update begins and installation progress is tracked on the screen. A “successfully updated” message displays once the installation process is complete.
6. Select OK to close the message and return to Scanner operations. The Scan Module, now has the latest firmware update and is ready to use.