Information
 The INFORMATION function provides you proprietary access to vehicle specific
repair and diagnostic information, from our exclusive online Snap-on Information
automotive repair database. The function is basically a one-stop-shop for all your
troubleshooting reference needs, and includes detailed repair and maintenance
information to help you fix the problem and get the vehicle back in service.
The INFORMATION function provides you proprietary access to vehicle specific
repair and diagnostic information, from our exclusive online Snap-on Information
automotive repair database. The function is basically a one-stop-shop for all your
troubleshooting reference needs, and includes detailed repair and maintenance
information to help you fix the problem and get the vehicle back in service.
 Wi-Fi is Required to Use This Application ! See Wi-Fi Connection*
Wi-Fi is Required to Use This Application ! See Wi-Fi Connection (new tab)
Snap-on Information Features:
| ● | OEM recall and technical service bulletin information |
| ● | DTC lookup, providing descriptive DTC troubleshooting information |
| ● | Diagnostic step-by-step testing procedures |
| ● | Vehicle specific repair cost estimating with printable estimates |
| ● | Lubricant and fluid specifications |
| ● | Adjustment procedures and specifications |
| ● | Maintenance schedules and procedures, including printable forms |
| ● | Electrical connector and pin identification |
| ● | Printable component and system wiring diagrams |
| ● | Component locations, pictures and identification |
| ● | Battery connection and initialization information |
| ● | Component specifications |
| ● | Component operation/theory information |
| ● | Scope trace (waveform) examples |
| ● | CAN-Bus diagnostic and component reference information |
| ● | Dashboard warning light and indicator symbol information ................and more! |
Vehicle information (all types) may not be available for every vehicle, and or every vehicle system. Selections that are grayed out indicate information is not available.
The Snap-on Information service is included with current diagnostic tool system software. To use the Snap-on Information service you must have the current diagnostic software upgrade installed.
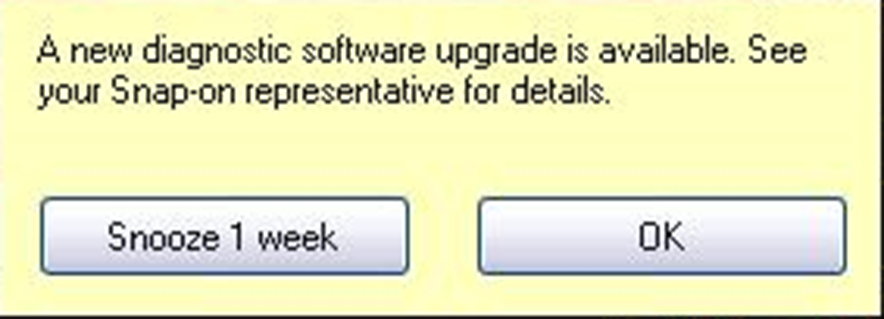
Approximately 30 days before expiration, a message will be displayed as a reminder to keep your software current and retain your Snap-on Information access. Selecting OK will close the message and selecting Snooze 1 Week will close the message box for approximately one week and then it will re-appear.
To purchase software upgrades, see your Snap-on Representative.
To use the Snap-on Information service, you must have a strong Wi-Fi connection and access to the Internet. Internet access is required to connect to the exclusive online Snap-on Information site. To set up your Wi-Fi connection, see Wi-Fi Setup
Once you have established your Wi-Fi and Internet connection, select the
Information icon  from home screen to begin using the service.
Depending on your software version and connection status the following messages may appear, informing you of status or action needed:
| ● | Content May Be Available!—indicates content may be available, however you are not currently connected to the online site. This message may be caused by a Wi-Fi connection issue or if you do not have the current software upgrade installed. |
| ● | Loading content— indicates information is being updated from the online database. |
| ● | A new diagnostic software upgrade is available. See your sales representative for details—indicates your access to the online site will be expiring soon and you should contact your sales representative to purchase the current software upgrade. |
| ● | Your access has expired. See your Snap-on representative to renew.— indicates your access to the online site has expired and you should contact your sales representative to purchase the current software upgrade. |
| ● | Network unavailable.—indicates that you have a connection problem with your wireless network. |
| ● | Device not Found.—indicates that your diagnostic tool is not registered in the information database. Contact customer support for assistance. |
Select the Information icon from home screen to begin using the online Snap-on Information service. Then the vehicle selection or the vehicle confirmation screen will open, depending if a vehicle is currently identified or not.
Vehicle identification is required to filter and display the specific technical information for the vehicle selected.
If a vehicle is currently identified, a confirmation screen is displayed and by selecting OK, the vehicle information is automatically loaded and opens the Main screen.
If a vehicle is not identified, a series of vehicle identification screens are displayed to allow you to enter the applicable information.
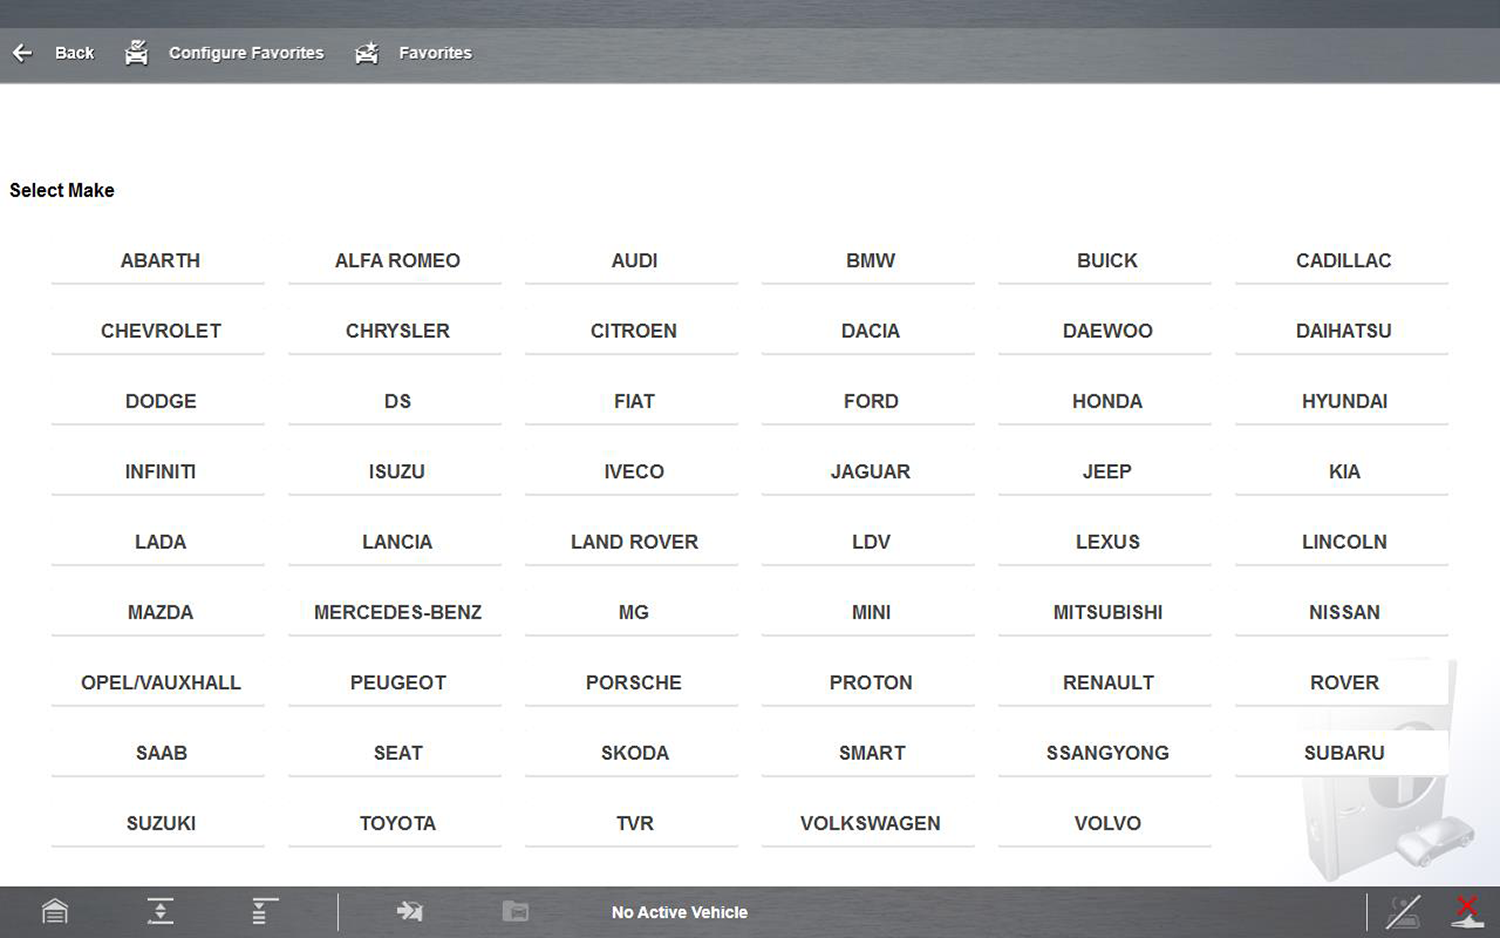
| 1. | From the Vehicle Make selection screen, select the vehicle make (manufacturer). |
| 2. | Continue through the screen prompts to identify the vehicle by selecting the following: |
| ● | Model |
| ● | Year |
| ● | Engine |
| ● | Engine Details |
A vehicle confirmation screen is displayed.
| 3. | Select OK or Cancel to continue. |
Selecting OK from the confirmation screen, opens the Snap-on Information application.
Vehicle Section Toolbar Functions
Toolbar functions from the vehicle selection screen, are as follows:
| ● | Back—allows you to return to the previous screen |
| ● | Configure Favorites—allows you to create a favorites list of frequently selected vehicle makes |
| ● | Favorites/Full List—toggles the displayed vehicle make list between the full and favorites list views |
The main screen is the central portal to all vehicle information and includes multiple tabs and functions.
Main screen features are shown in the following illustration, and descriptions with links are provided in this section.
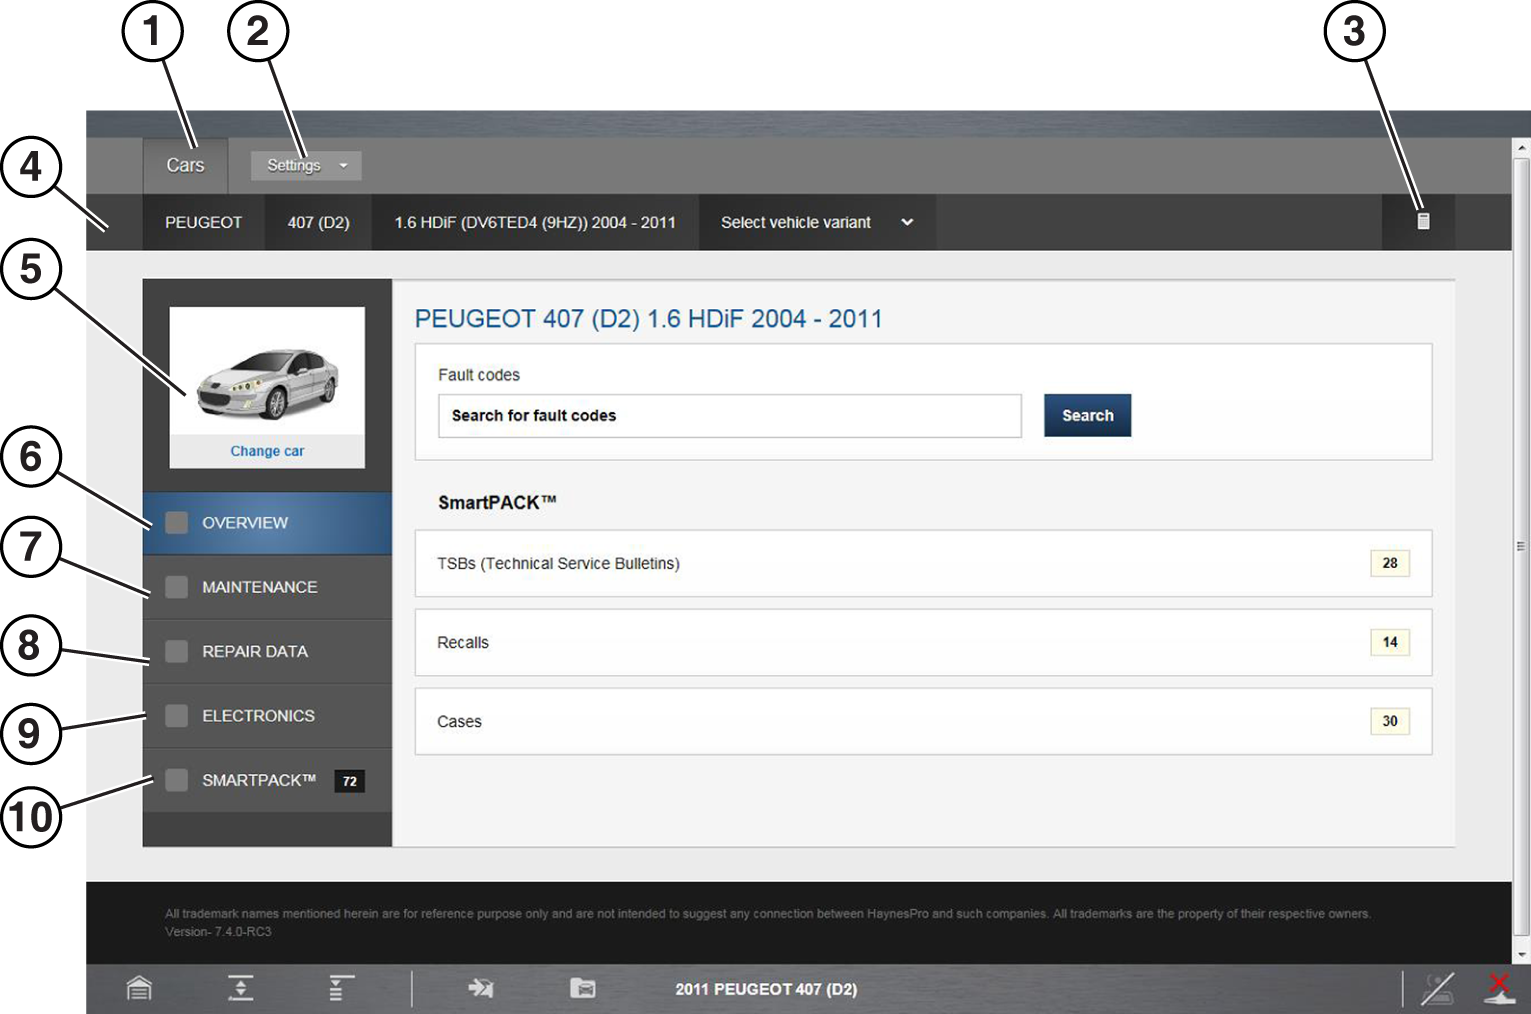
| 1. | Cars—The Cars tab is available at all times from the main screen toolbar. Selecting Cars, allows you to change the vehicle and returns you to the Vehicle Selection screen. |
| 2. | Settings—The Settings dropdown list is available at all times from the main screen toolbar and includes the following functions, Preferences, About and Logout. |
| 3. | Converter—The Converter function is available at all times from the vehicle identification panel and provides basic metric to standard conversion functions for different units of measurement. |
| 4. | Vehicle Identification Panel—Displays current vehicle model information in selectable tabs. Each vehicle category information tab can be selected to navigate back to that selection screen to make changes. |
| 5. | Change Car Icon—Selecting this icon allows you to quickly return to the vehicle model selection screen. |
| 6. | Overview Tab |
| 7. | Maintenance Tab |
| 8. | Repair Data Tab |
| 9. | Electronics Tab |
| 10. | SmartPack Tab |
Settings
The Settings dropdown menu is available at all times from the main screen toolbar and includes the following functions:
| ● | Preferences |
| – | User Information—Allows you to enter and store your workshop contact information. |
| – | Regional Settings—Allows you to change system settings to your preferences. |
| – | Financial Settings—Allows you to set up to three different labor and Value-added Tax (VAT) rates to your preferences (used with cost estimating feature). |
| ● | About—Displays the Snap-on Information service license expiration date. |
| ● | Terms of Service (“TOS”) —Displays the Snap-on Information service end - user license agreement. |
The Converter function allows you to make basic metric to standard conversions for select units of measurement.
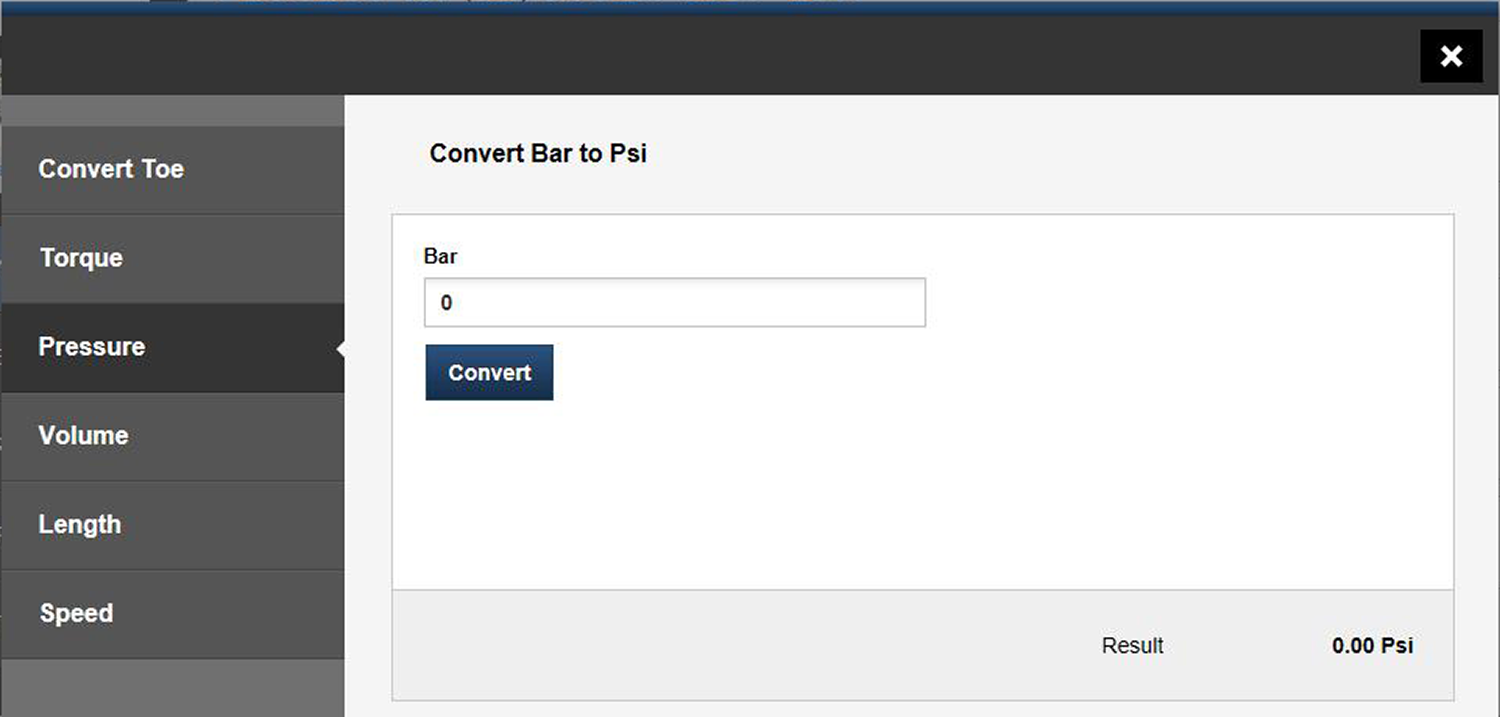
| 1. | Select the desired unit of measurement tab from the left side. |
| 2. | Enter the numerical value. |
| 3. | Select Convert, then view the result. |
| 1. | Select |
| ● | the Cars tab, or |
| ● | the current vehicle make from the vehicle information panel |
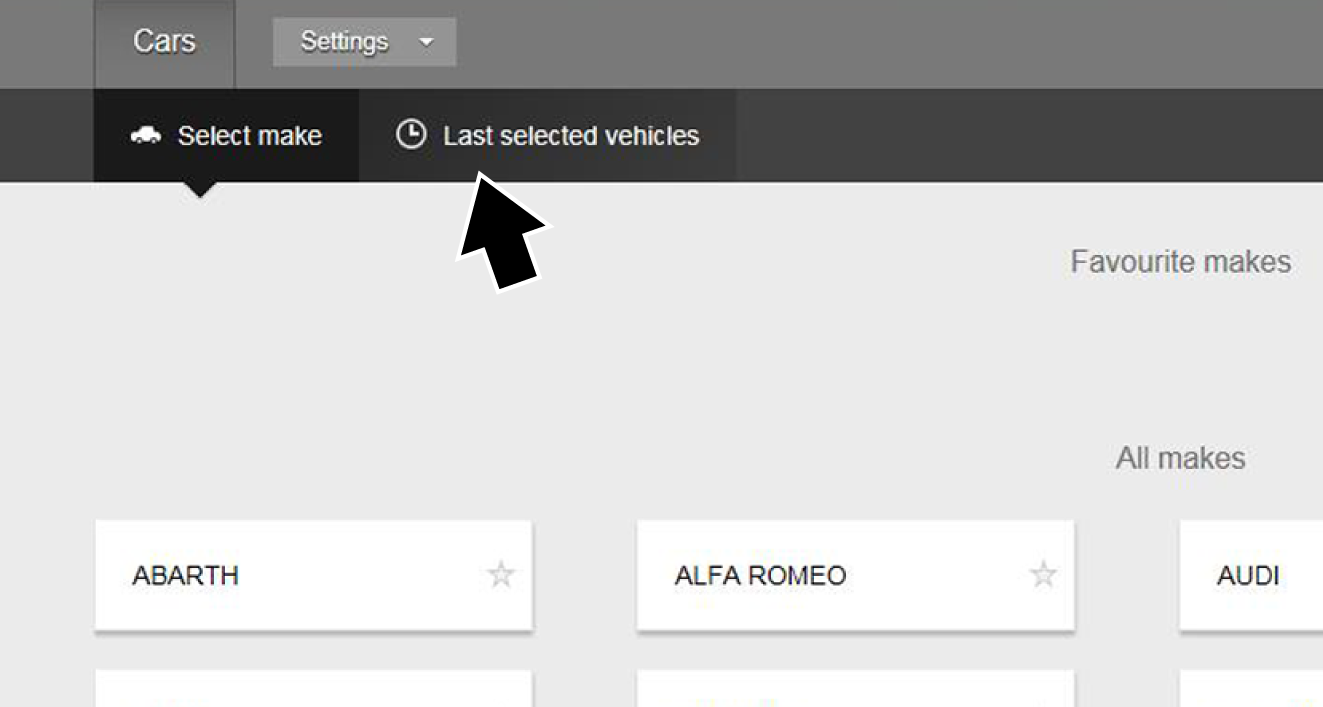
The vehicle make selection screen displays. The following display and search options are available:
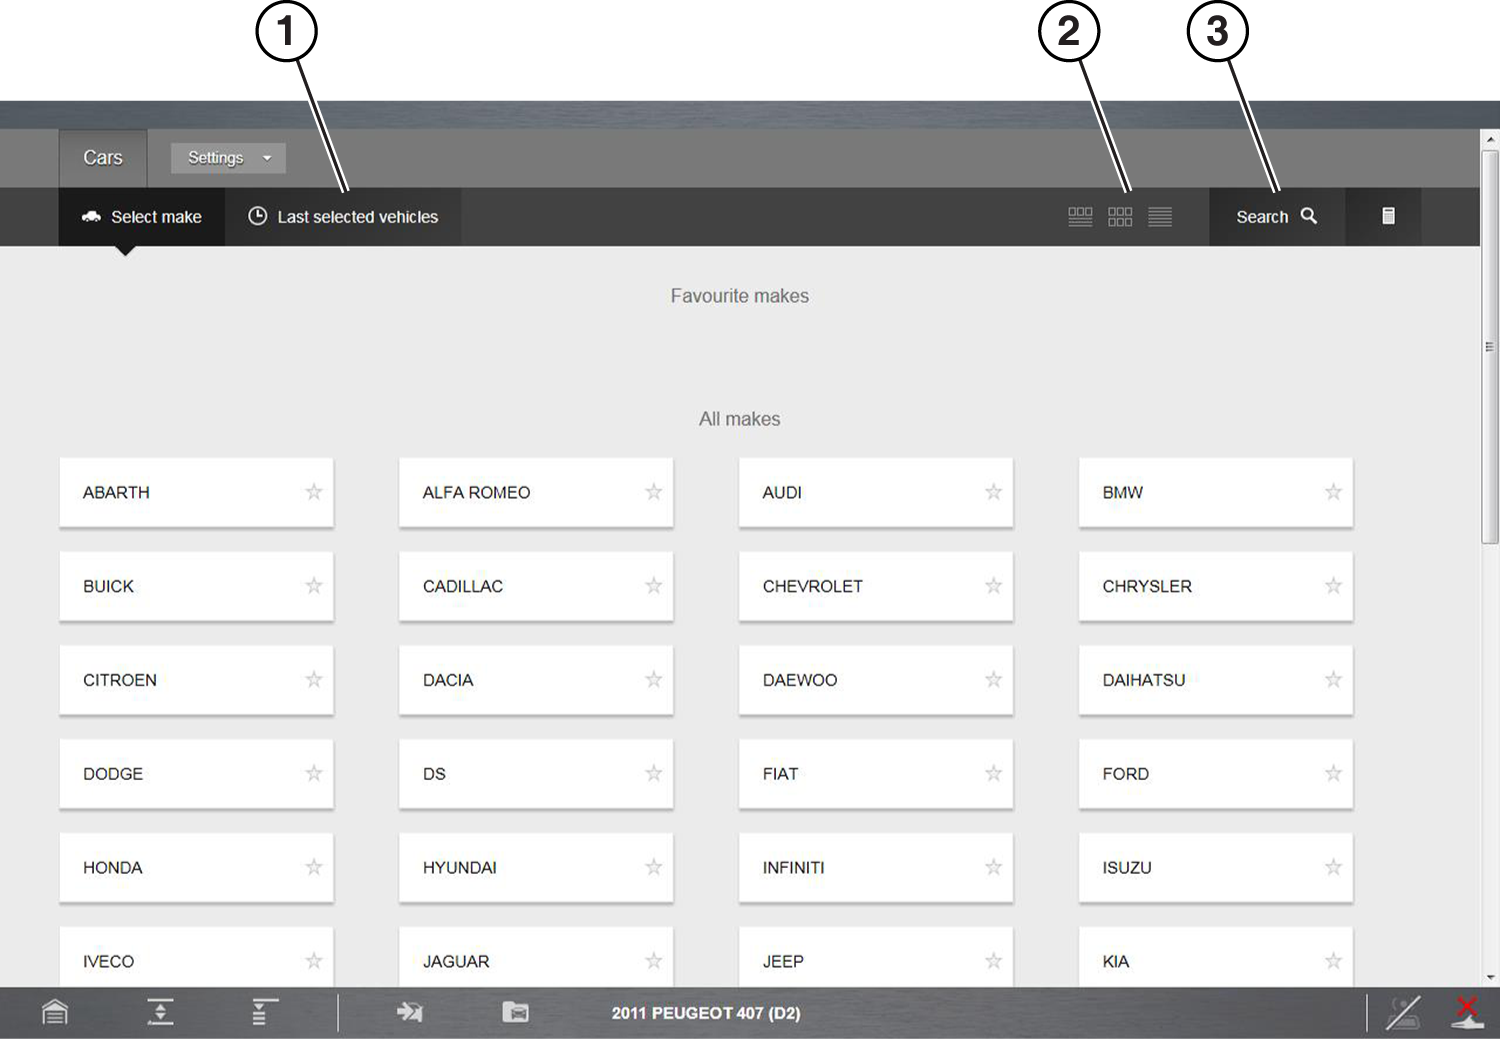
| 1. | Last Selected Vehicles—select this tab to display and choose a vehicle from a previous session. |
| 2. | View display options—three view display options are available depending on your preference (list, gallery and split). |
| 3. | Search—use the search function to quickly find and choose a specific vehicle manufacturer. |
After selecting the vehicle make, the Vehicle Base Model screen displays.
| 2. | Select the vehicle base model from the list. |
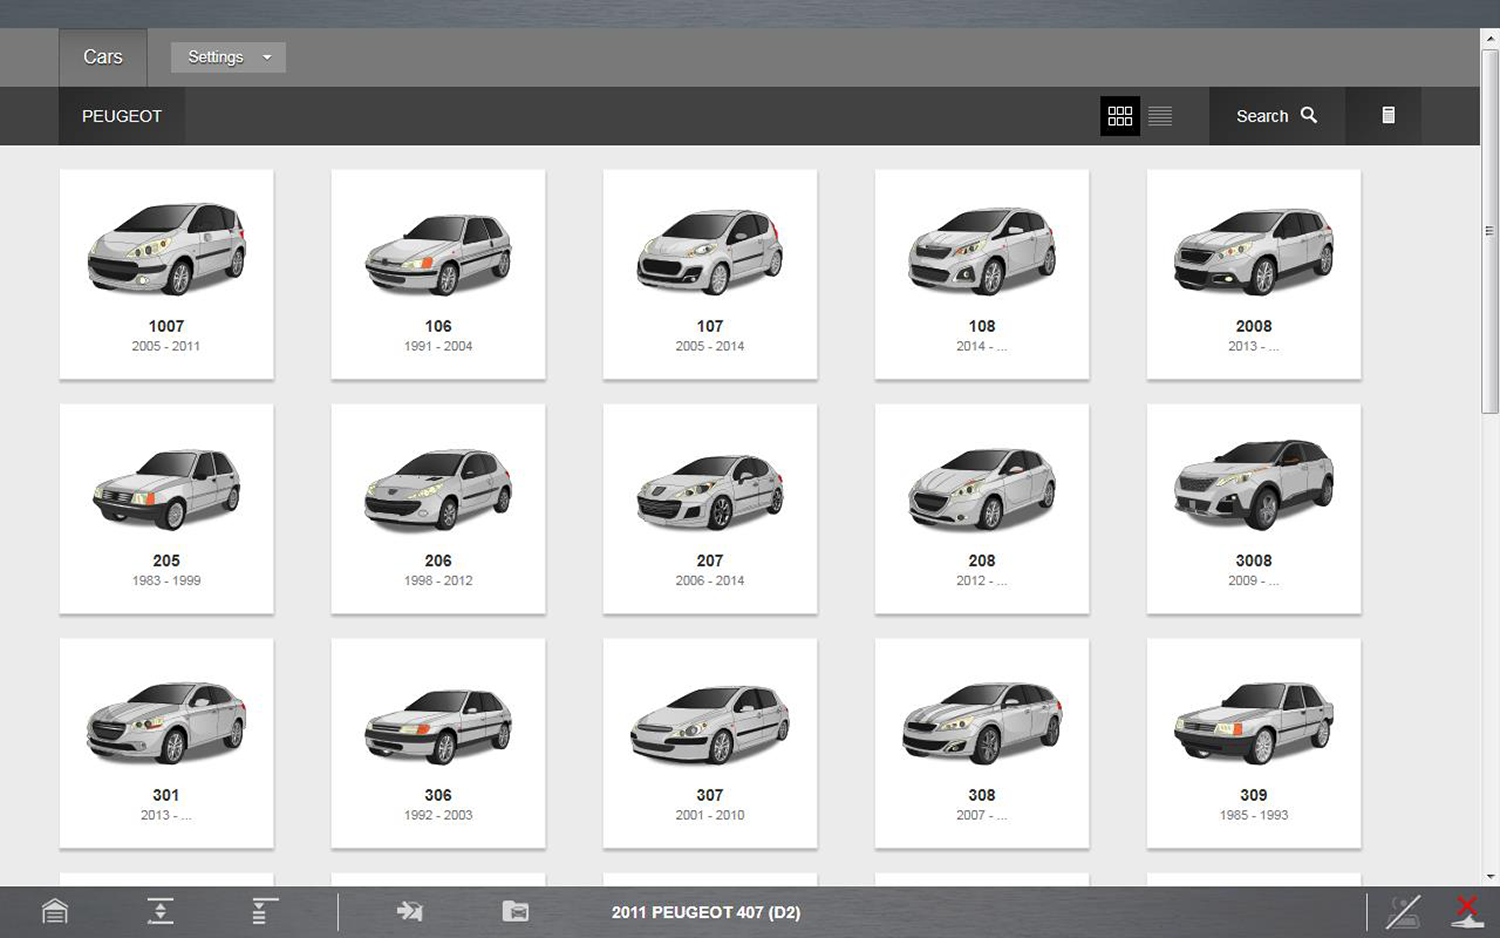
After selecting the vehicle base model, the Vehicle Model Option screen displays.
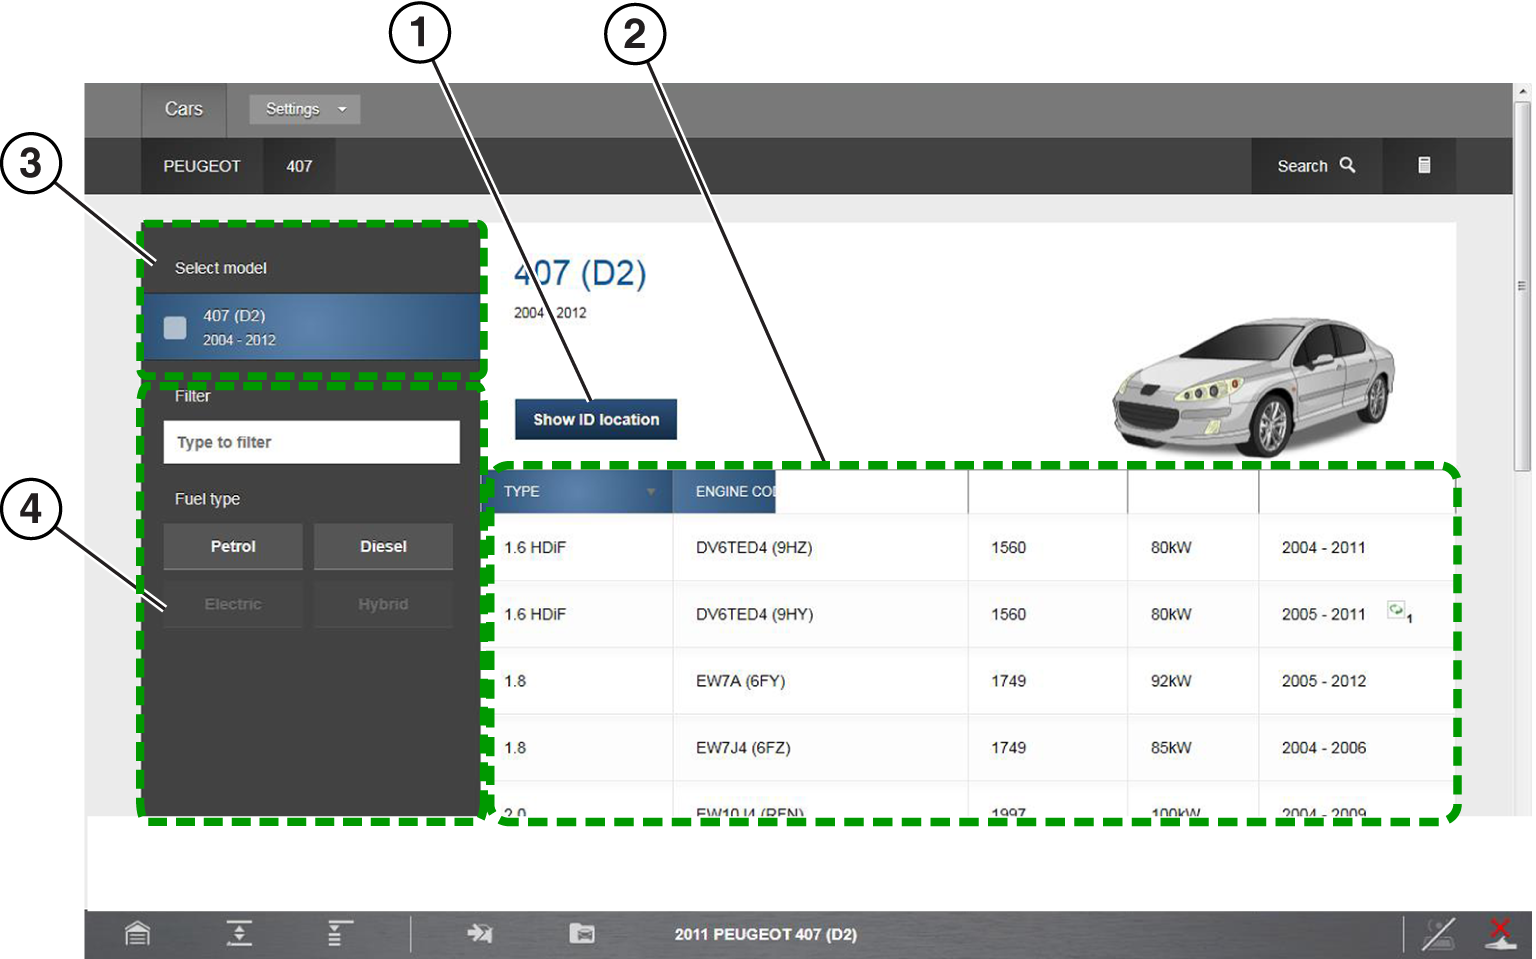
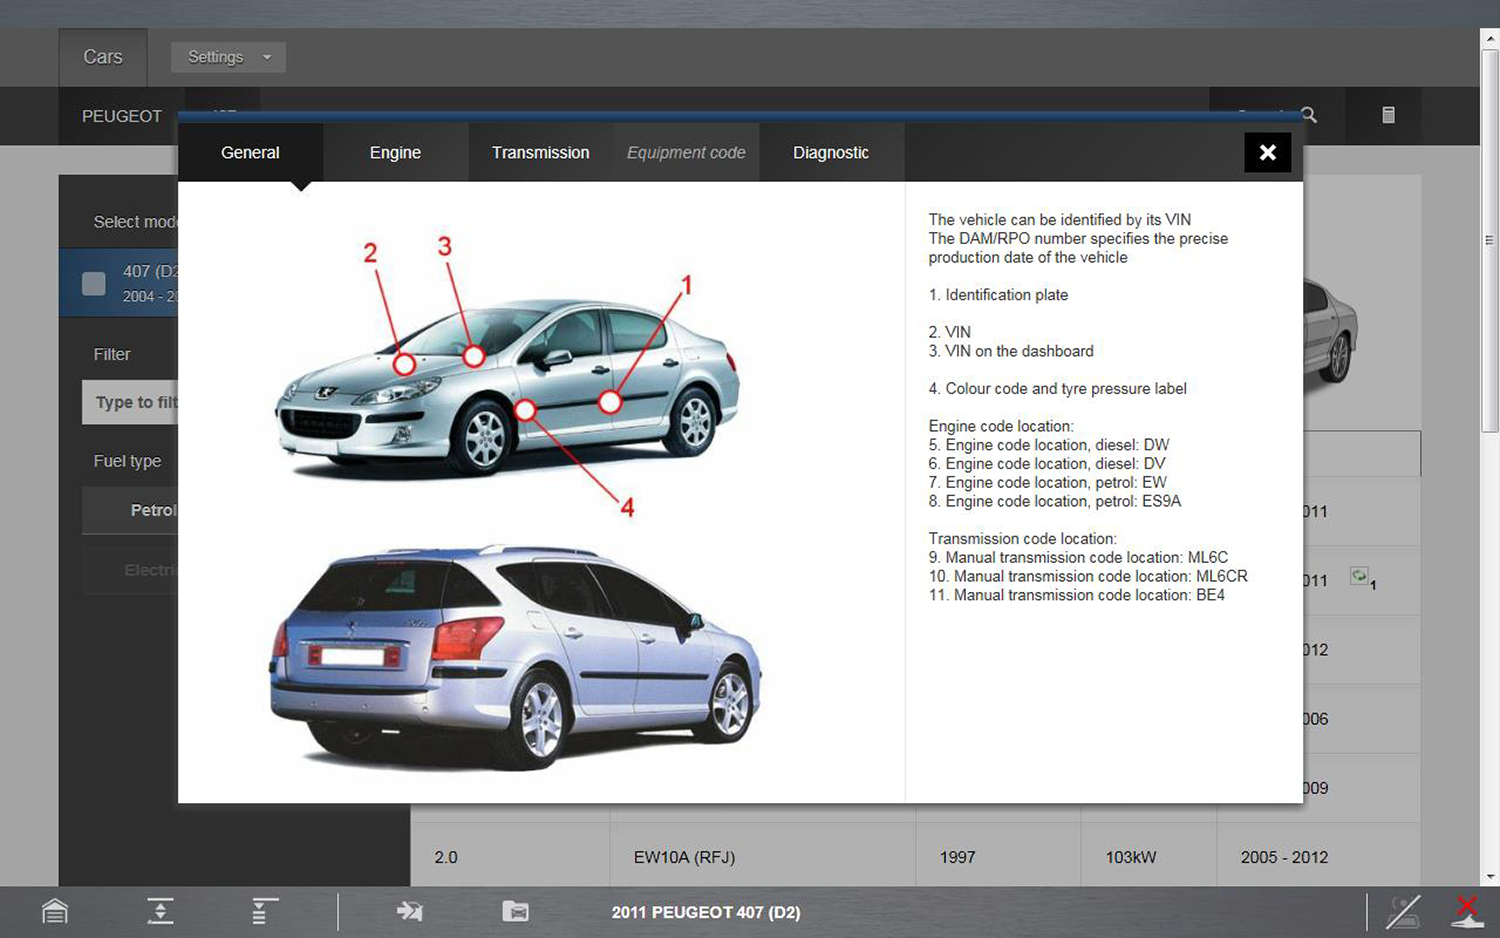
| 1. | Show ID Location icon—select to view the location of the vehicle ID |
| 2. | Base Model Selection (specific)—select the specific base model by engine type, size and code |
| 3. | Base Model Selection (general)—select the base model by general type |
| 4. | Filter Criteria—use the filter criteria to sort by various categories (e.g. fuel type, vehicle type, etc.) |
| 3. | Select the specific vehicle model options from the menus. |
Several selections may be required to identify the vehicle model, follow the screen prompts and enter the required information.
| ● | Select a general base model, then use the filter if needed to sort the results, and then choose a specific model from the list to continue. |
| ● | Each column in the detailed list is sortable, click on the column category tab to toggle the sort option between ascending and descending. |
| 4. | If needed, select the Show ID Location icon, to access visual help information to find the location of vehicle identification numbers. |
When the vehicle selection is complete, the Main screen displays with the available vehicle information.
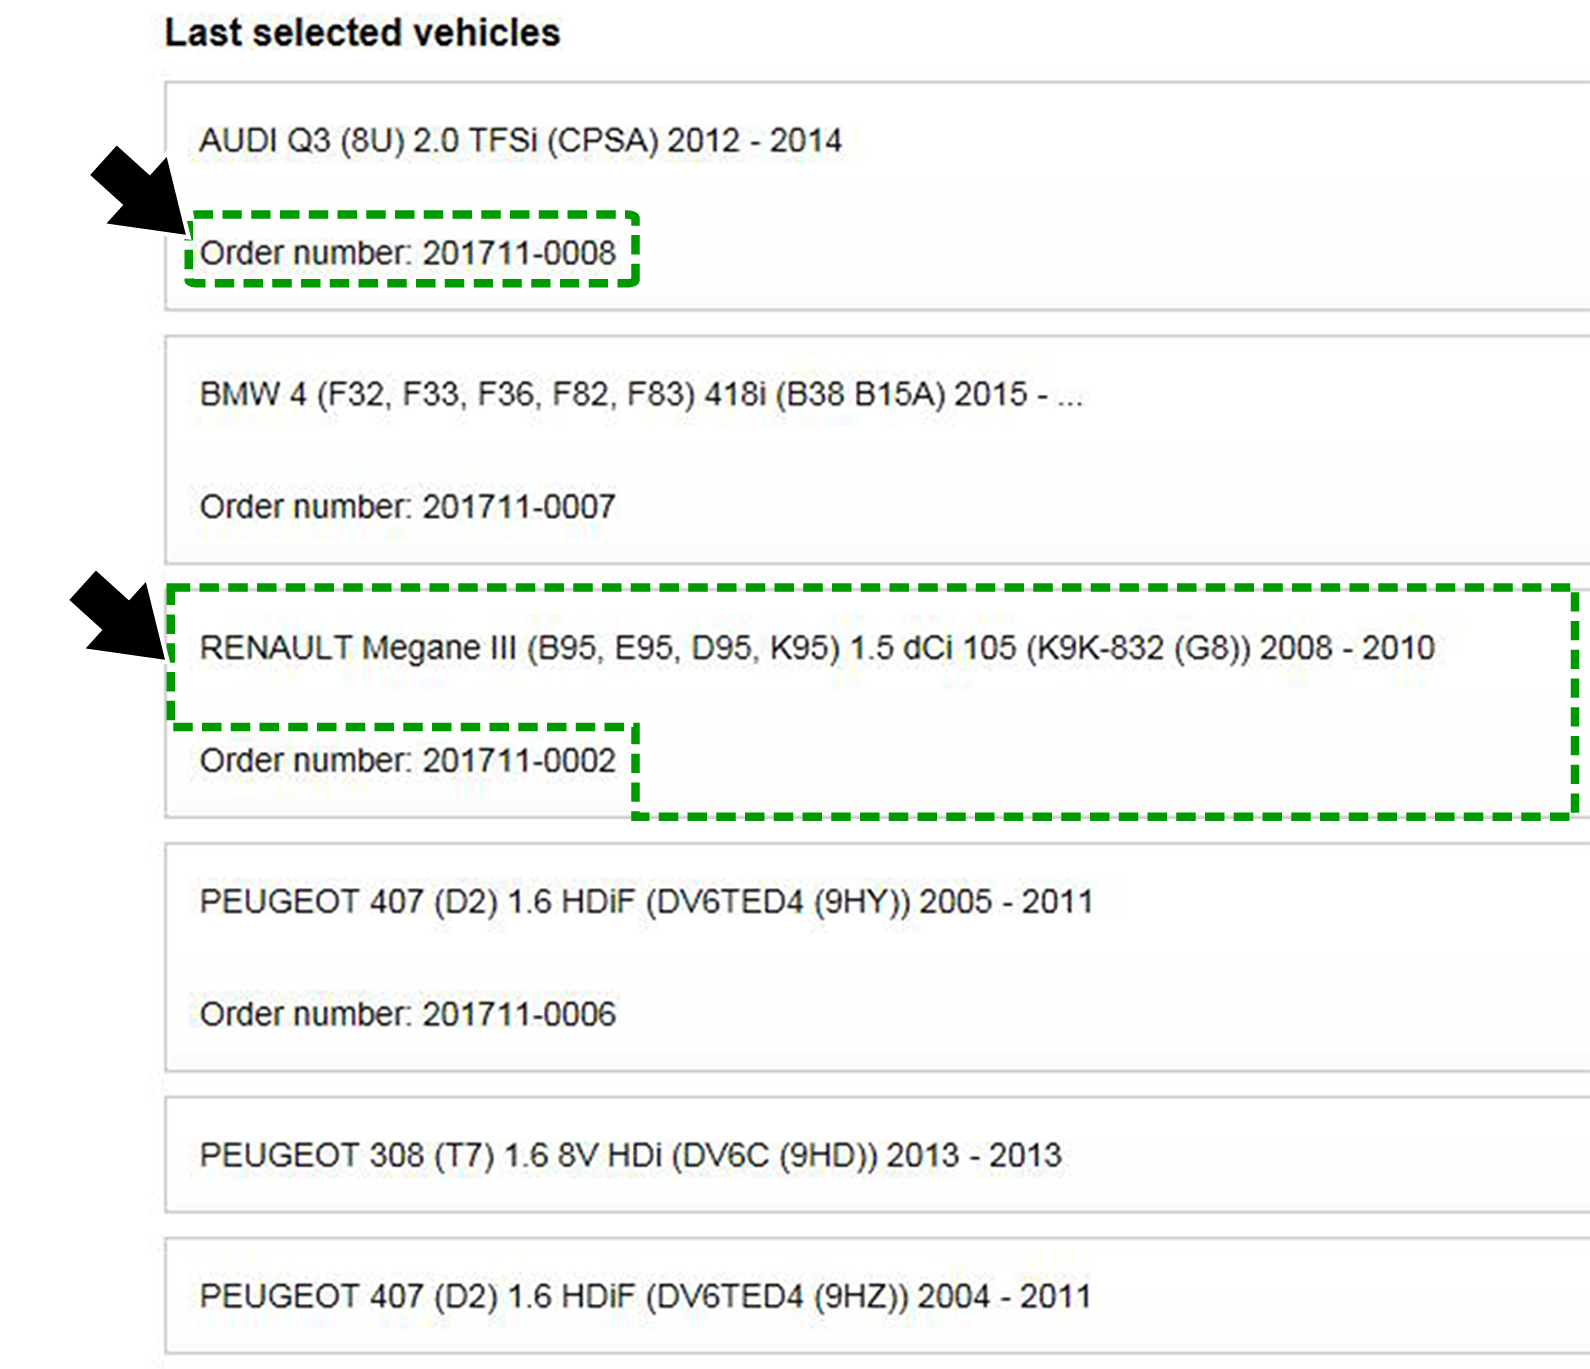
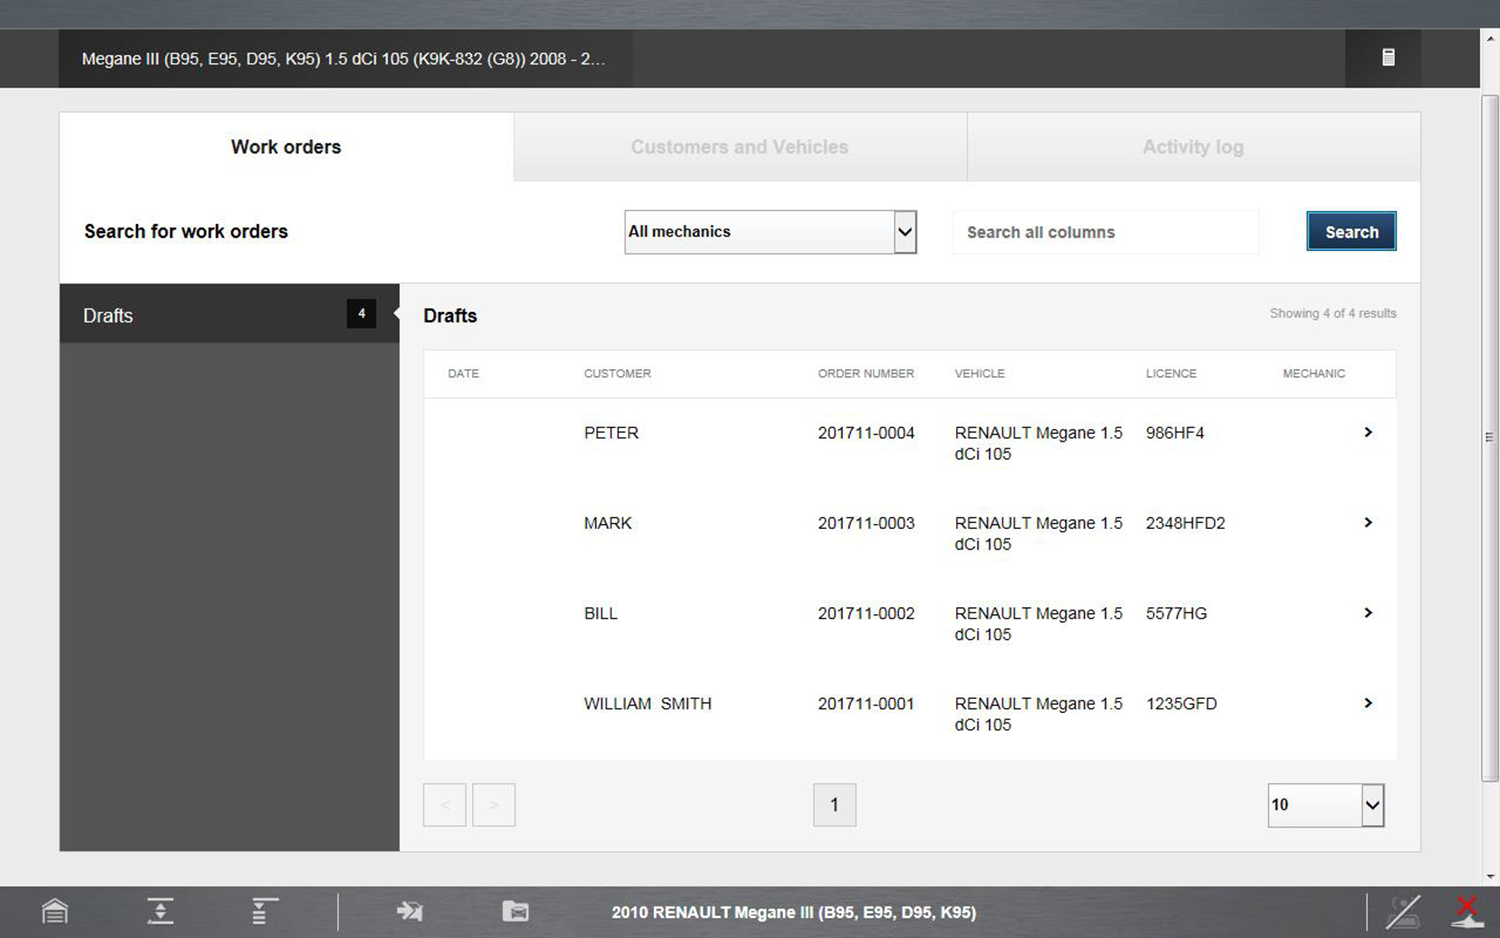
To Choose a Previously Selected Vehicle or Open a Saved Work Order Select Last Selected Vehicles from the vehicle make menu.
A list of the last ten vehicles selected is displayed. Vehicle records that include work orders are displayed with the work order number.
| ● | To open the work order, select the “Order number” text (e.g. Order Number: 201711-0025) (Figure upper arrow). |
| ● | Selecting the vehicle description text or other areas in the frame will start a new session for that vehicle (Figure lower arrow). |
The Overview screen is a summary display of all available vehicle information, and includes multiple tab panels and functions. Overview screen features are shown in the following illustration, with descriptions provided below.
To access the Overview screen at anytime, select the Overview tab from the main menu panel.
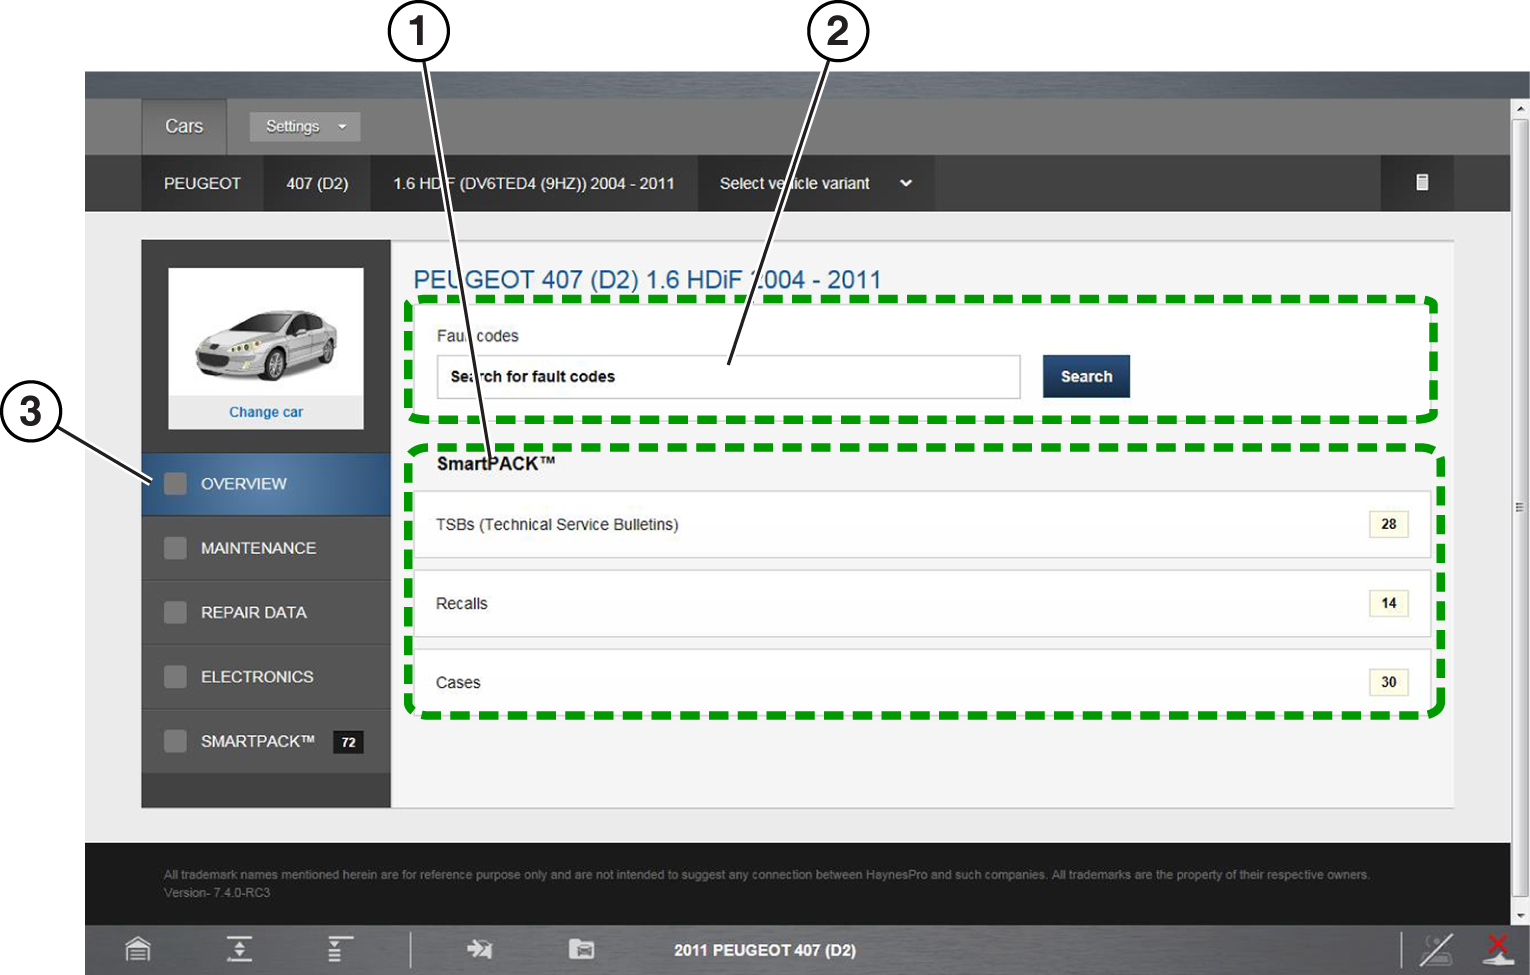
| 1. | SmartPACK Information Links—provides links to available diagnostic information (e.g. TSB’s, Recalls, and Cases) |
| 2. | Fault Code Search—allows quick searches for specific DTCs, |
| 3. | Overview Tab—displays the Overview screen |
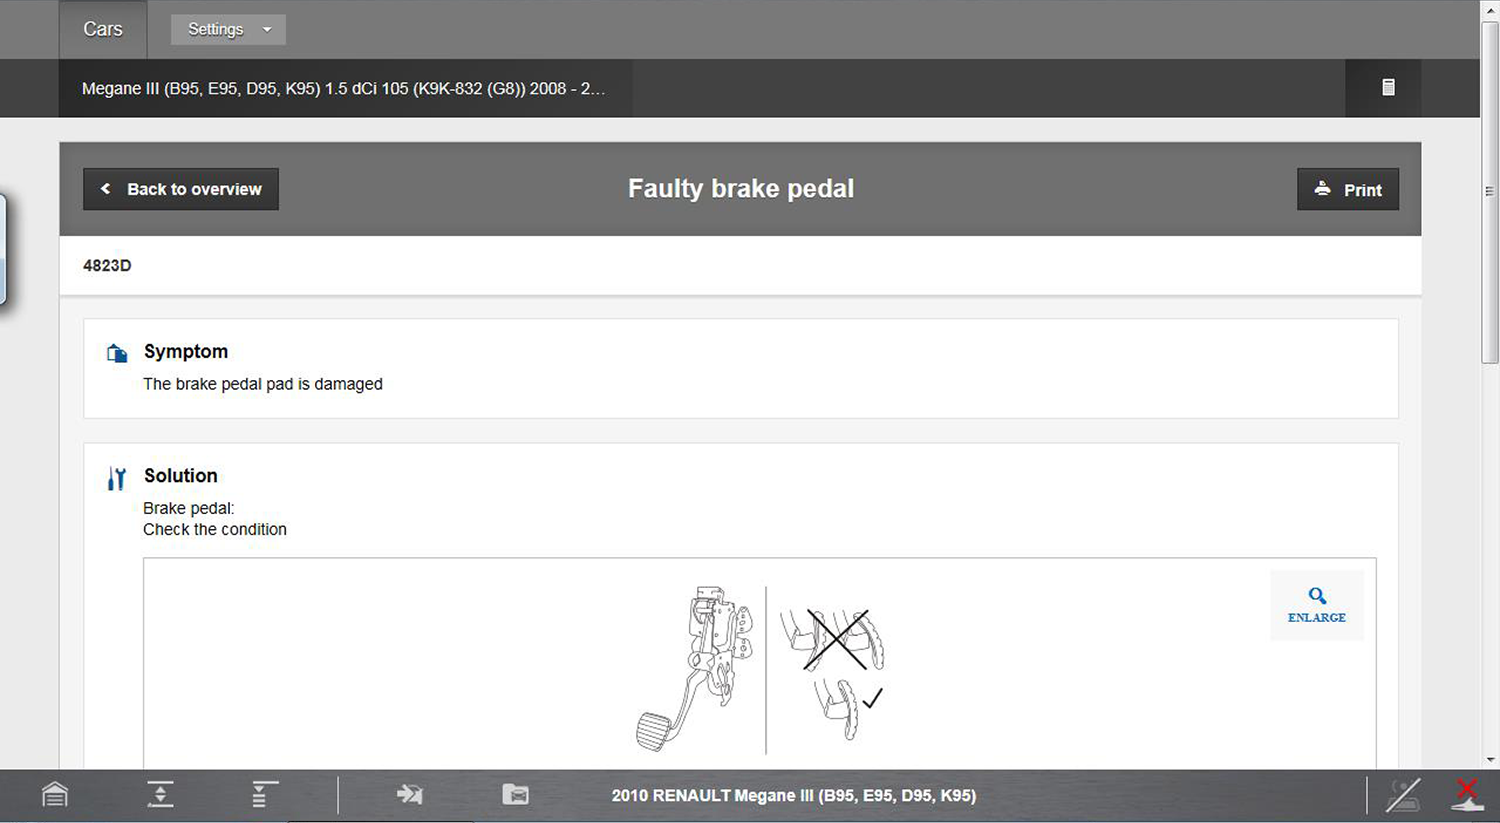
Fault Code Search
A search feature, is provided to help you quickly find vehicle specific DTC reference and related diagnostic information.
The DTC search results (if available) are displayed below the search field in a categorized list, by Electronic System, SmartCase, Recall data and TSB’s.
Select the desired result, to view the information.
After viewing the information, Select the Back to Fault Codes Search button to return to the result list.
Select the Reset button to clear the current code and start a new search.
Selecting Maintenance displays a submenu of all available vehicle maintenance information.
Submenu options may include the following:
| ● | Schedules - Vehicle specific maintenance schedules including estimated labour times, parts required, procedures and intervals. |
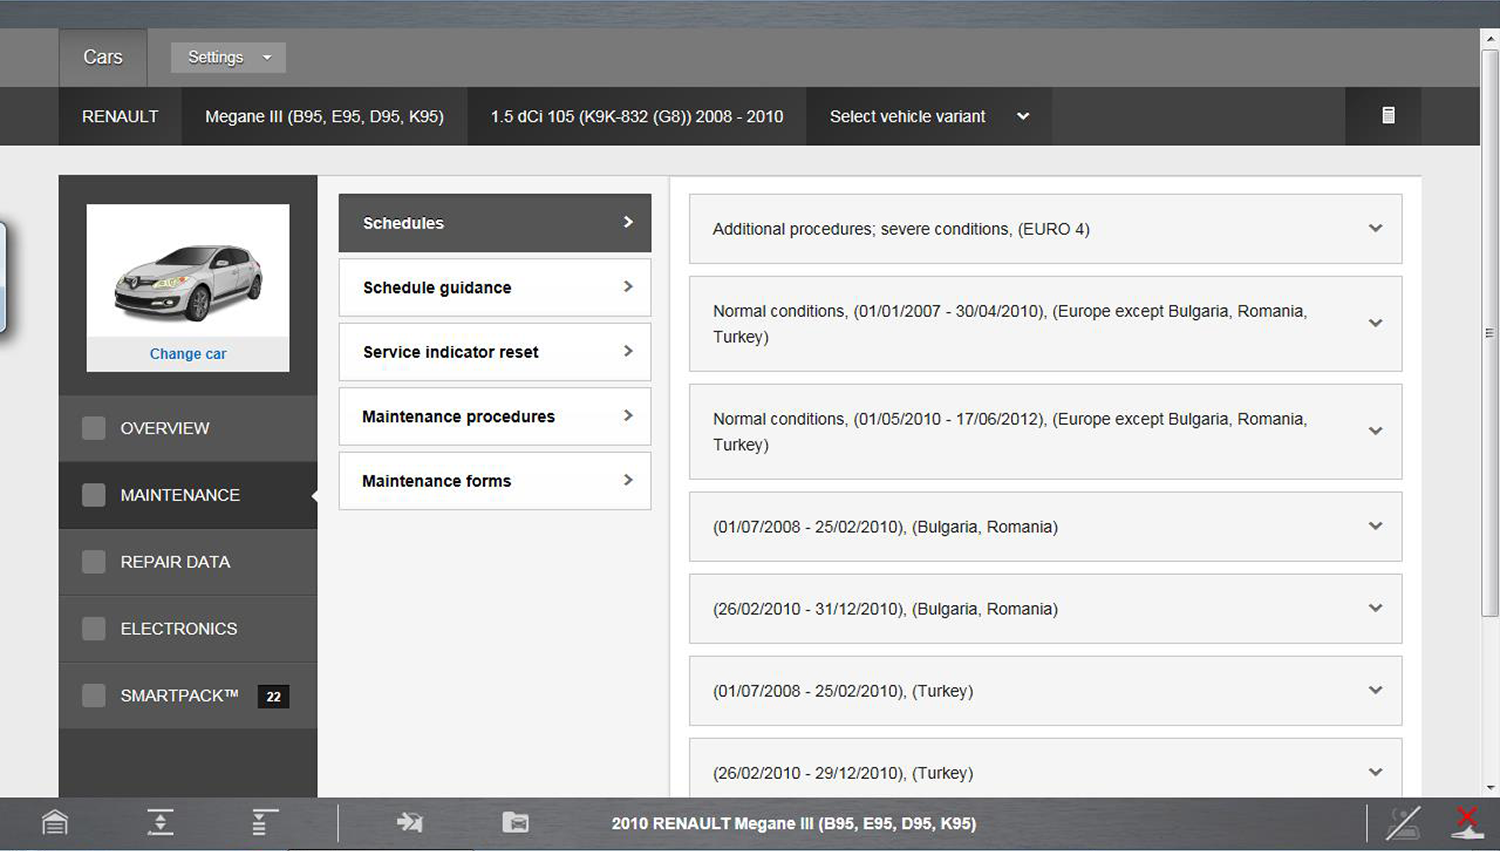
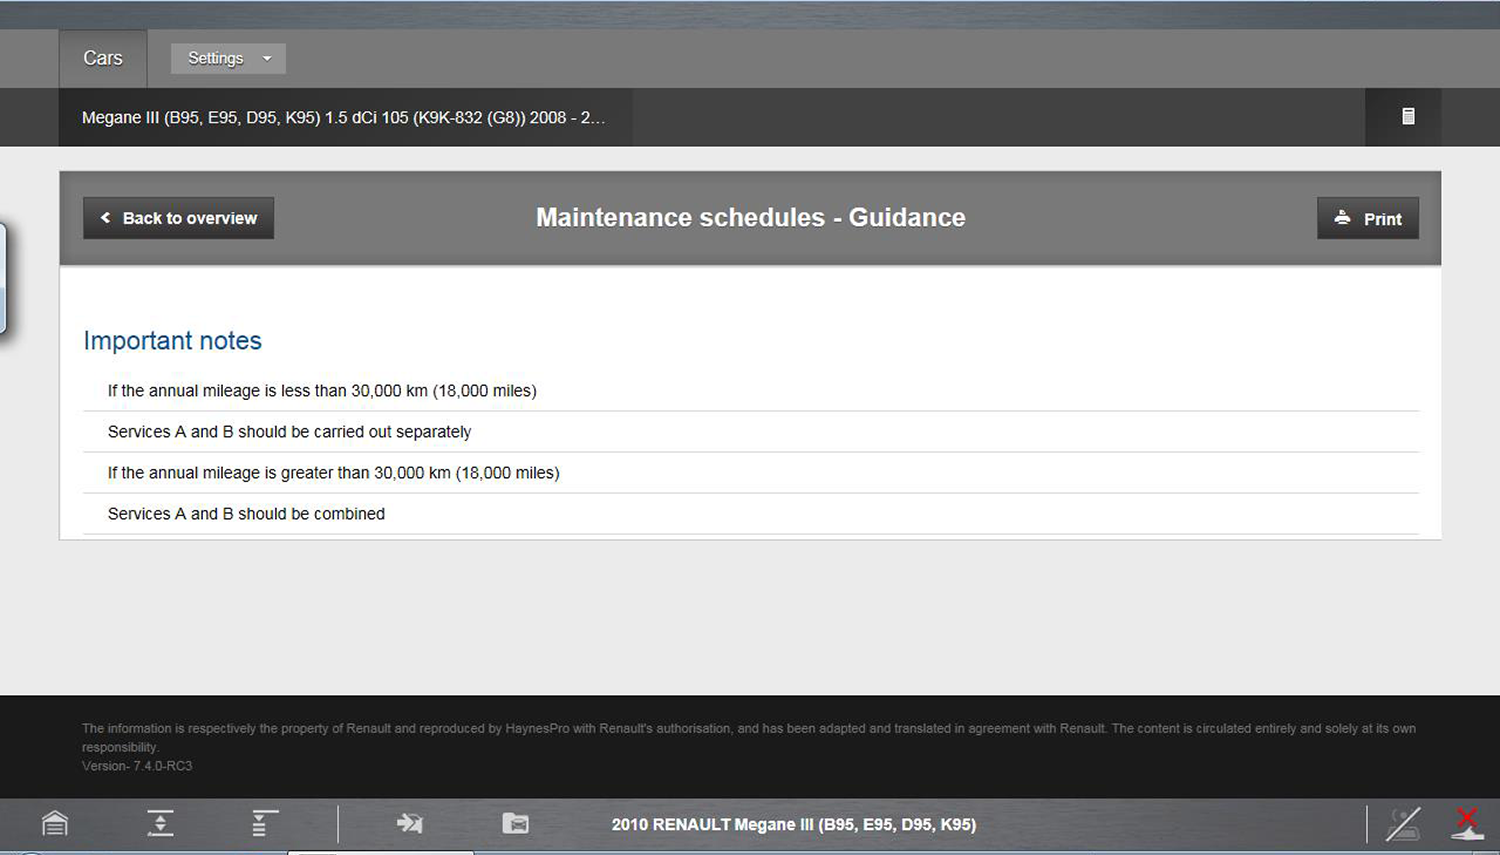
Schedule Guidance - Important notes and guidelines about the available schedules.
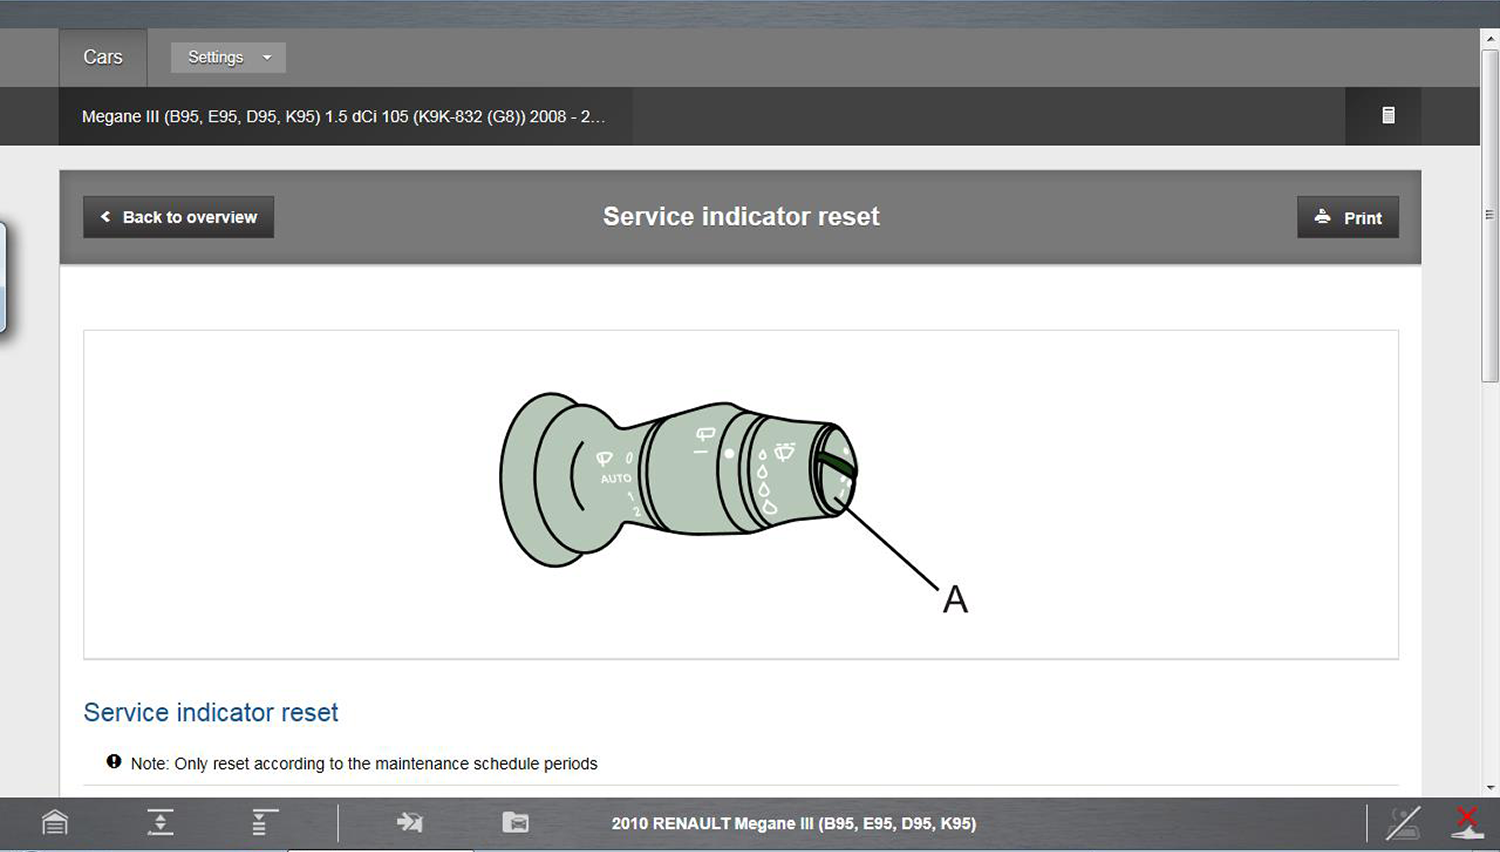
Service Indicator Reset - Indicator reset procedures.
Maintenance Procedures - Instructions for common maintenance procedures.
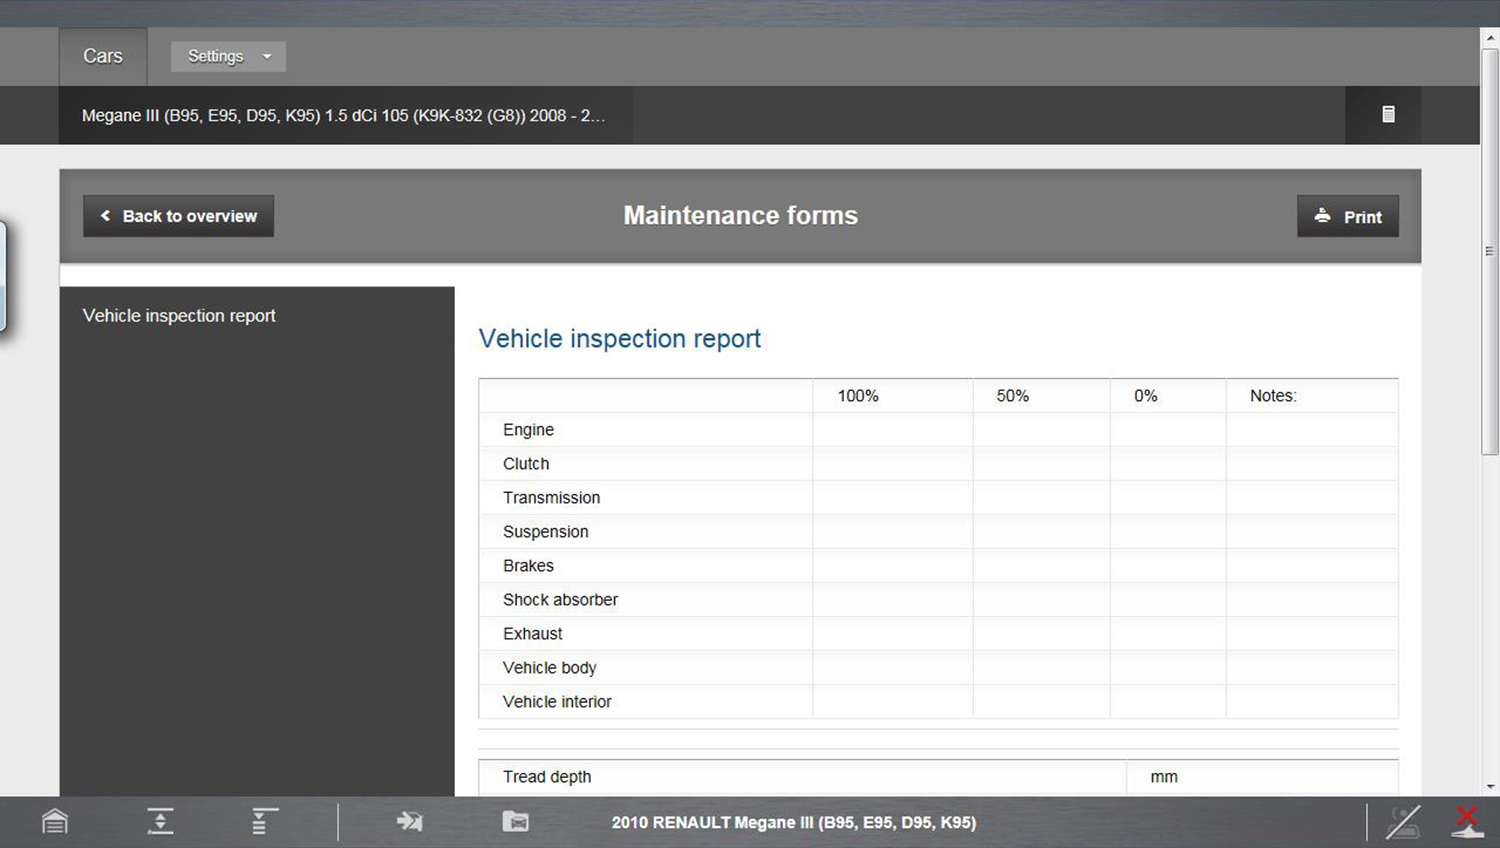
Maintenance Forms - Printable forms for common inspection reports.
Selecting Repair Data, displays a submenu of all available vehicle repair information by system.
Submenu options may include the following systems:
| ● | Engine |
| ● | Transmission |
| ● | Steering and Suspension |
| ● | Brakes |
| ● | Exterior/Interior |
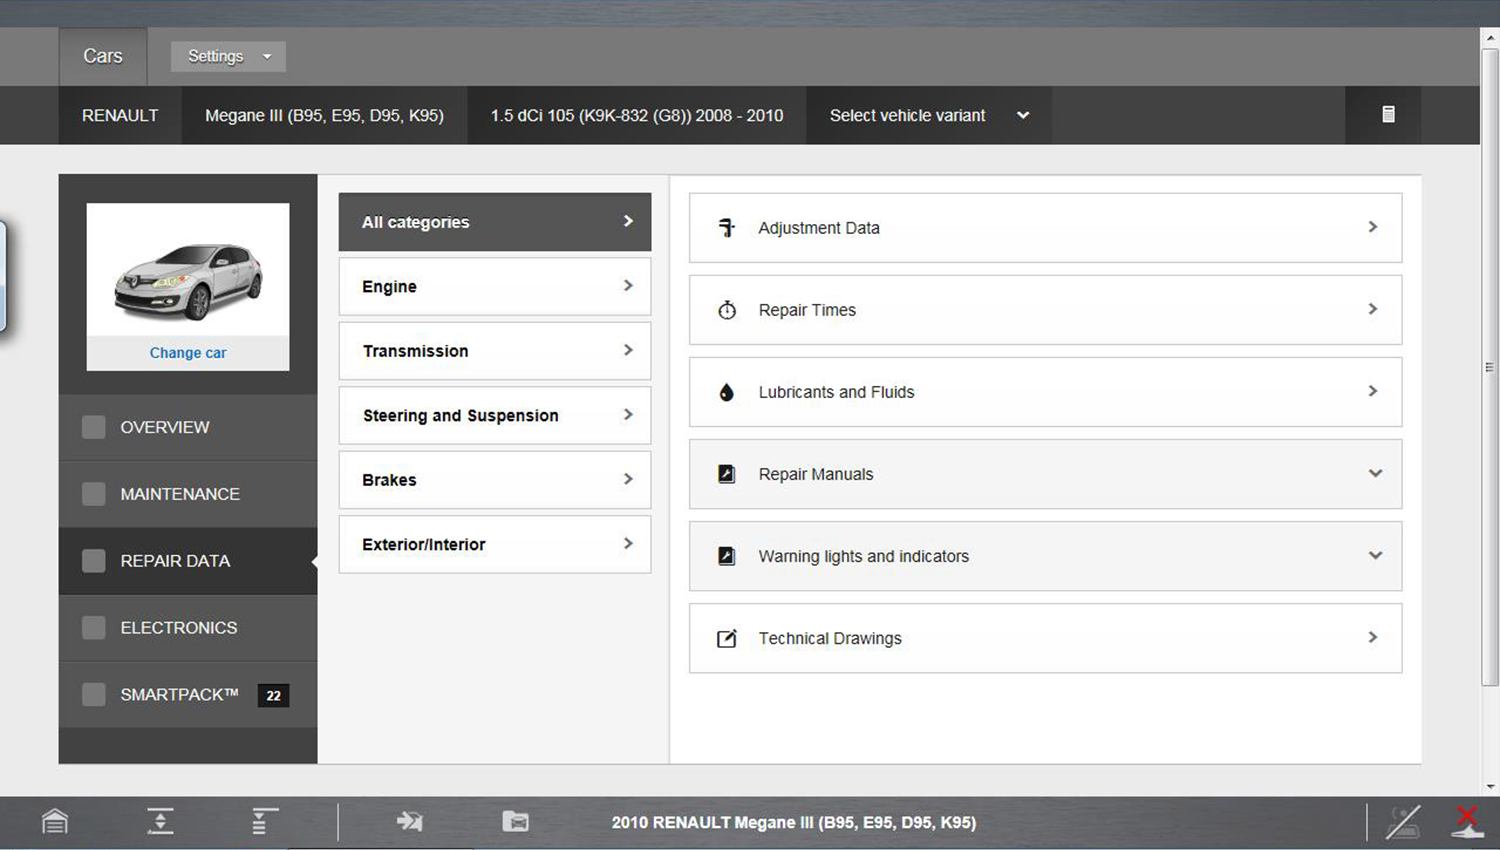
Repair Data information options may include:
| ● | Lubricants and Fluids - Fluid and lubricant specifications, (e.g type, capacity, and fill/drain locations) |
| ● | Repair Manuals - Service and repair instructions, component installation and removal procedures |
| ● | Warning Lights and Indicators - Descriptions of the warning lights and indicators |
| ● | Technical Drawings - Illustrated and exploded drawings of assemblies with fastener torque specifications |
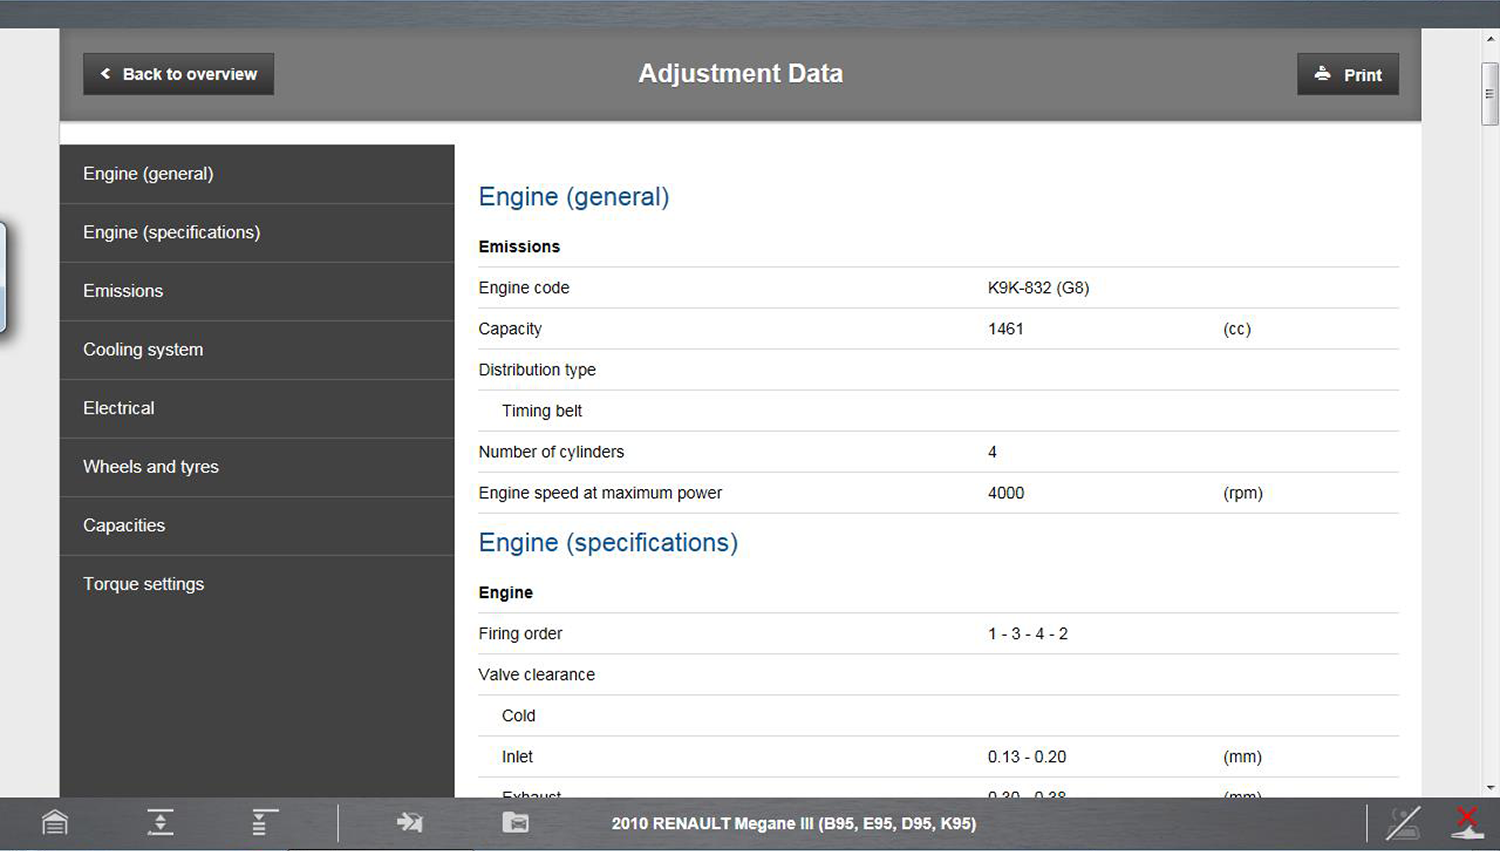
| ● | Adjustment Data - General information and common vehicle maintenance and repair specifications |
| ● | Repair Times - Allows you to create a custom repair cost estimate for your customer using built-in recommended labor times and your shop labor rate |
Create a custom cost estimate:
| 1. | Choose the applicable system from the menu to display job options. |
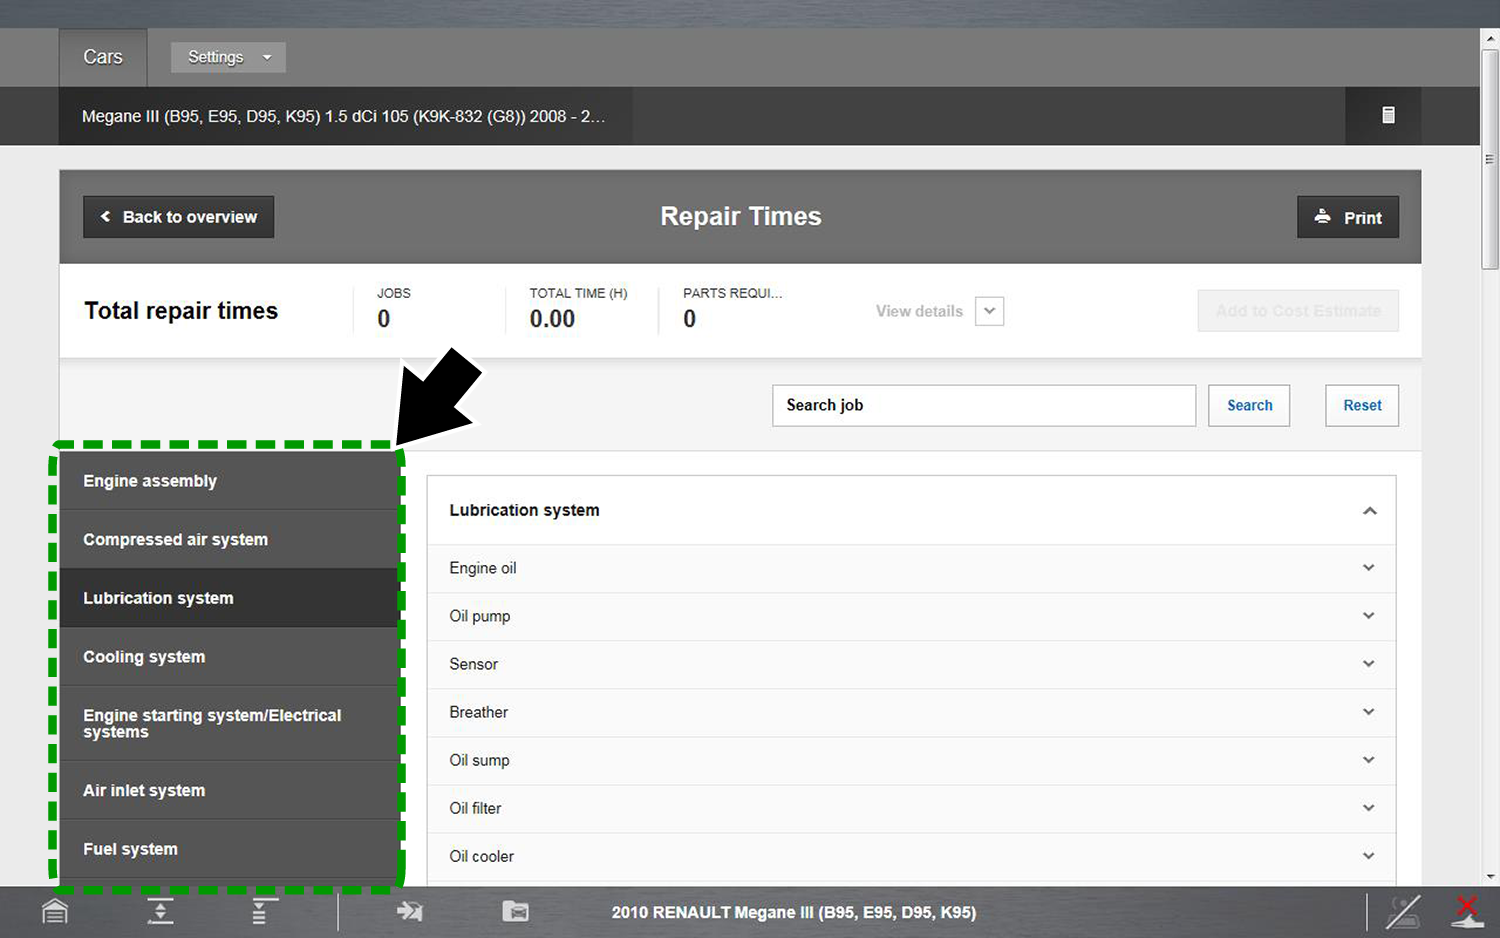
| 2. | Choose the applicable job by selecting the + mark |
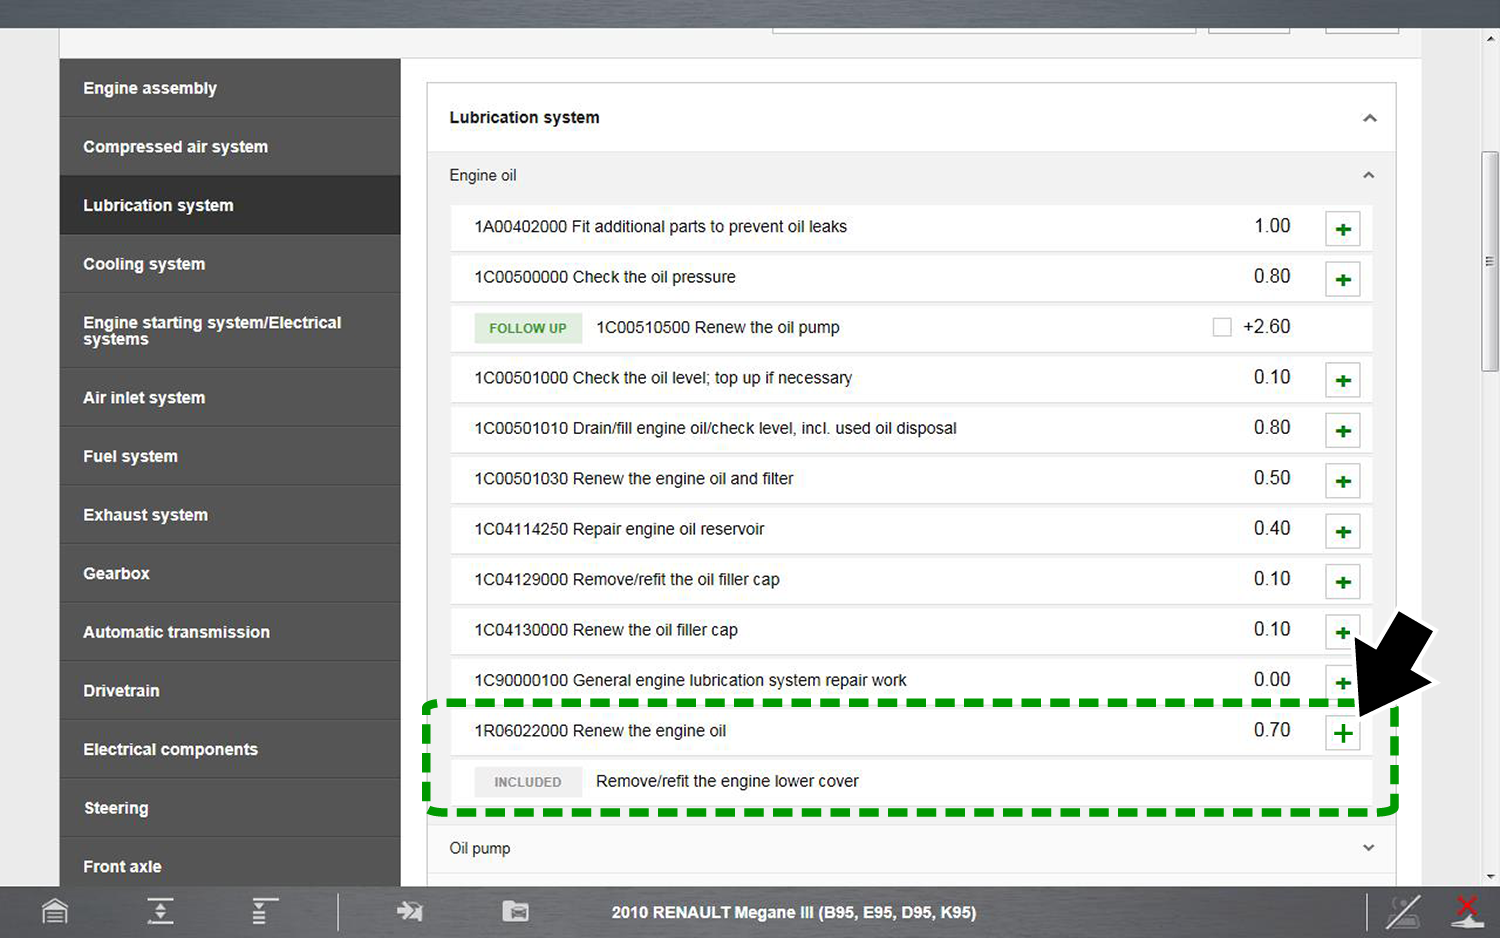
The selected job is added to the summary at the top of the page
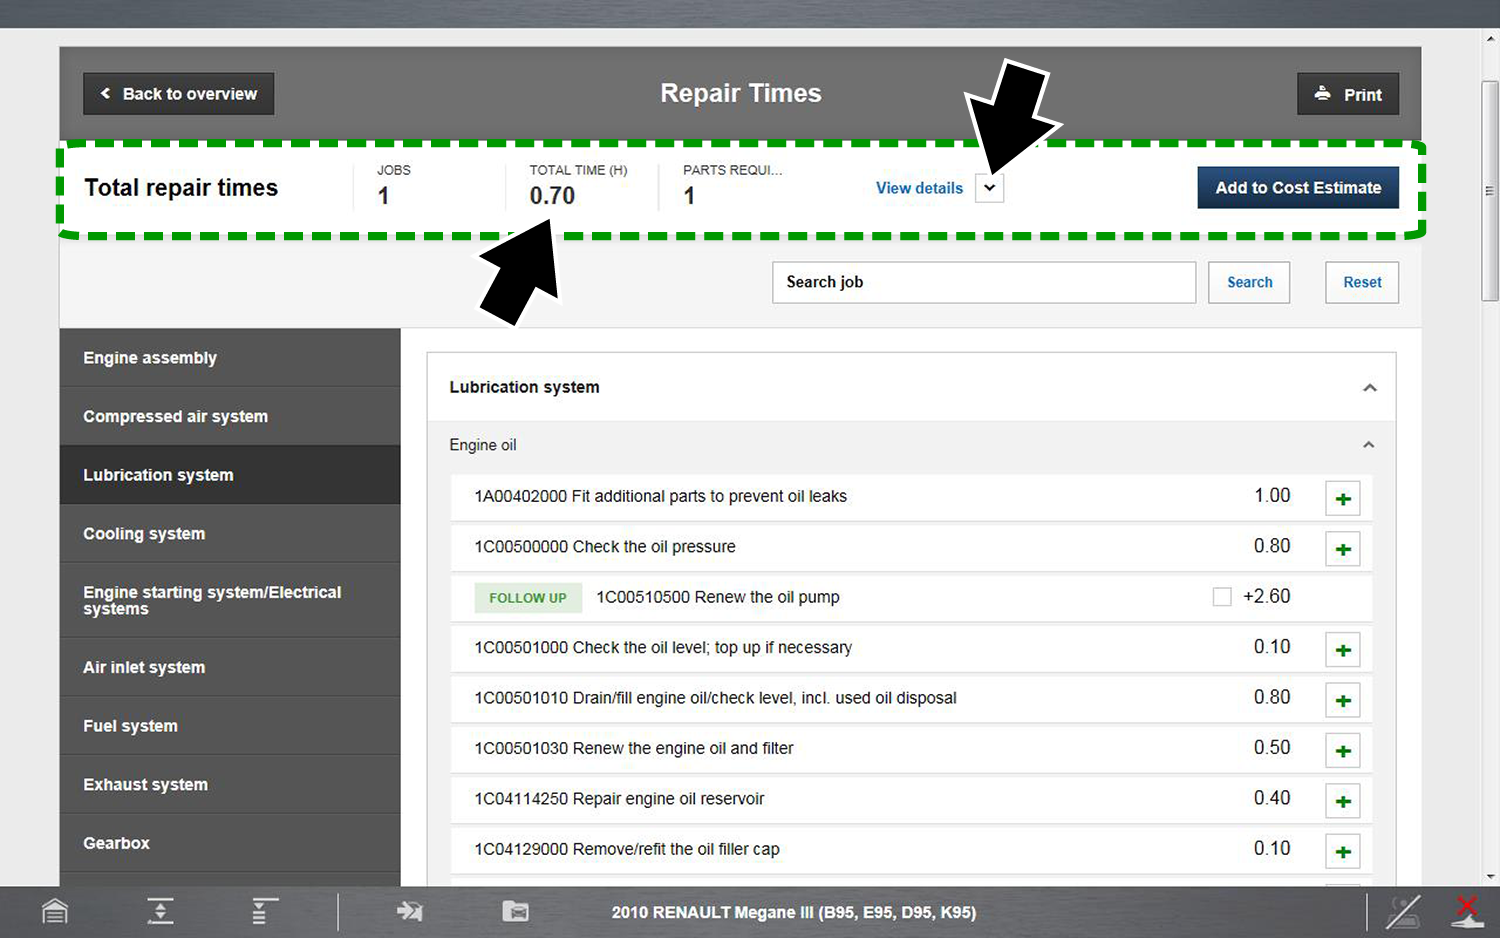
| 3. | Select the View Details dropdown box to display your selections |
To remove a job select the X mark.
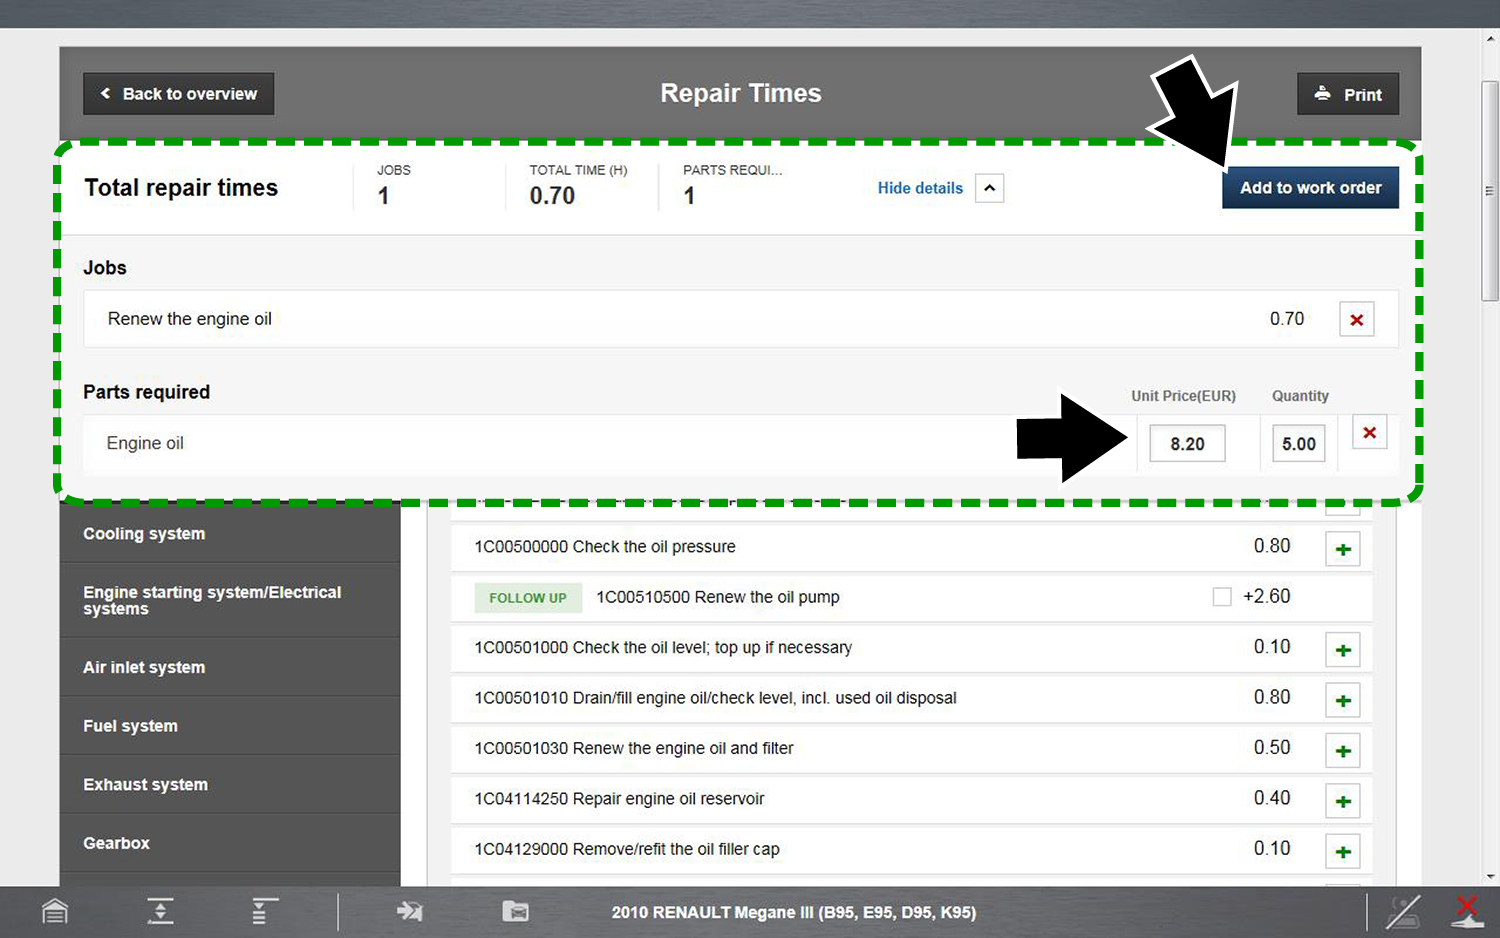
| 4. | Enter the “Parts Required” unit price and “Quantity” as needed. Select the + mark when finished. |
| 5. | When completed, select Add to Cost Estimate or Add to Work Order |
The Cost Estimate form displays
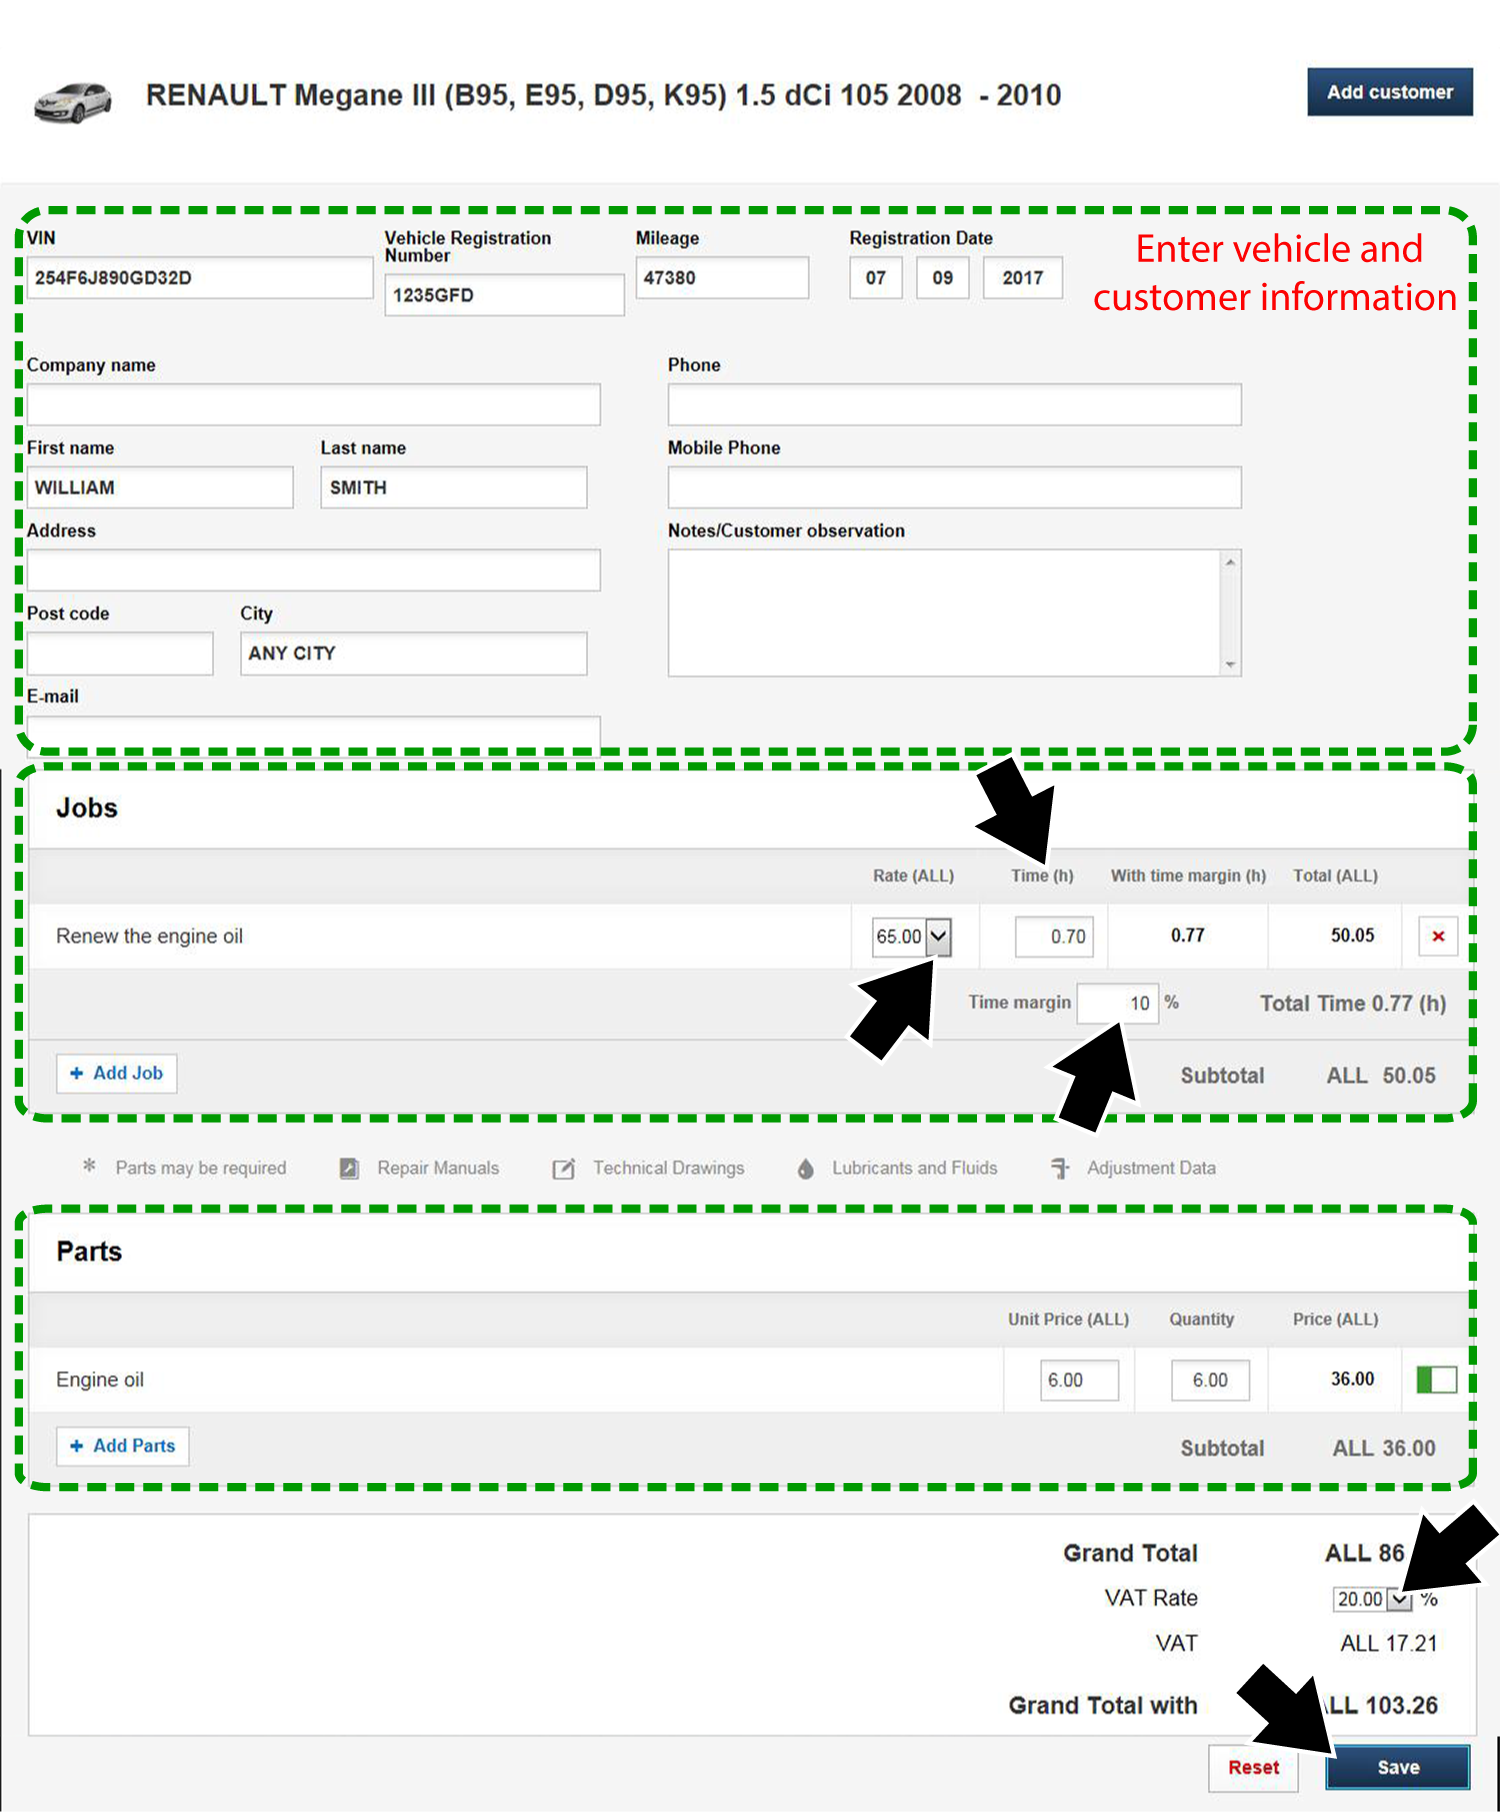
| 6. | Fill in all customer and vehicle information fields as required. |
| 7. | In the Jobs section of the form, select the applicable shop labour rate from the dropdown box |
You may set up to three custom labour rates. To setup shop labour rates, select the Settings dropdown box from the main screen and then select Preferences. Scroll down to the Financial Settings section to Labour Rates and VAT Rates. You may setup three labour rates and three VAT rates with custom names. Select Save when finished. These custom rate options are displayed in the dropdown boxes on the Cost Estimate form.
All editable value fields on the form may be changed manually. Select the field to make a change. Enter all applicable values using a decimal point.
| 8. | Enter a time margin percentage if needed. The entered number will either increase or decrease the built-in “Time(h)” by the percentage entered. To enter a negative percentage (decrease %) enter “-” (e.g. -10.0). |
| 9. | In the Parts section of the form. make any needed changes. |
| 10. | Choose the applicable VAT rate. (As defined in Settings > Preferences, see note above). |
| 11. | When completed, select Save. The Work Order manager screen displays. This is a list of all saved work orders. To open/edit a work order, select it from the list. Search and sort functions are provided to quickly find a record. |
Selecting the electronics tab, displays a submenu of all available vehicle electrical reference and testing information.
Submenu options may include the following:
| ● | All Electronic Systems |
| ● | Engine |
| ● | Steering and Suspension |
| ● | Brake • Exterior/Interior |
| ● | Fuses and Relays |
| ● | Locations |
| ● | Electronic Procedures |
| ● | Warning Lights and Indicators |
To access the Electronics screen at anytime, select Electronics from the main menu panel.
The Electronics main screen feature locations are shown in the following illustration.
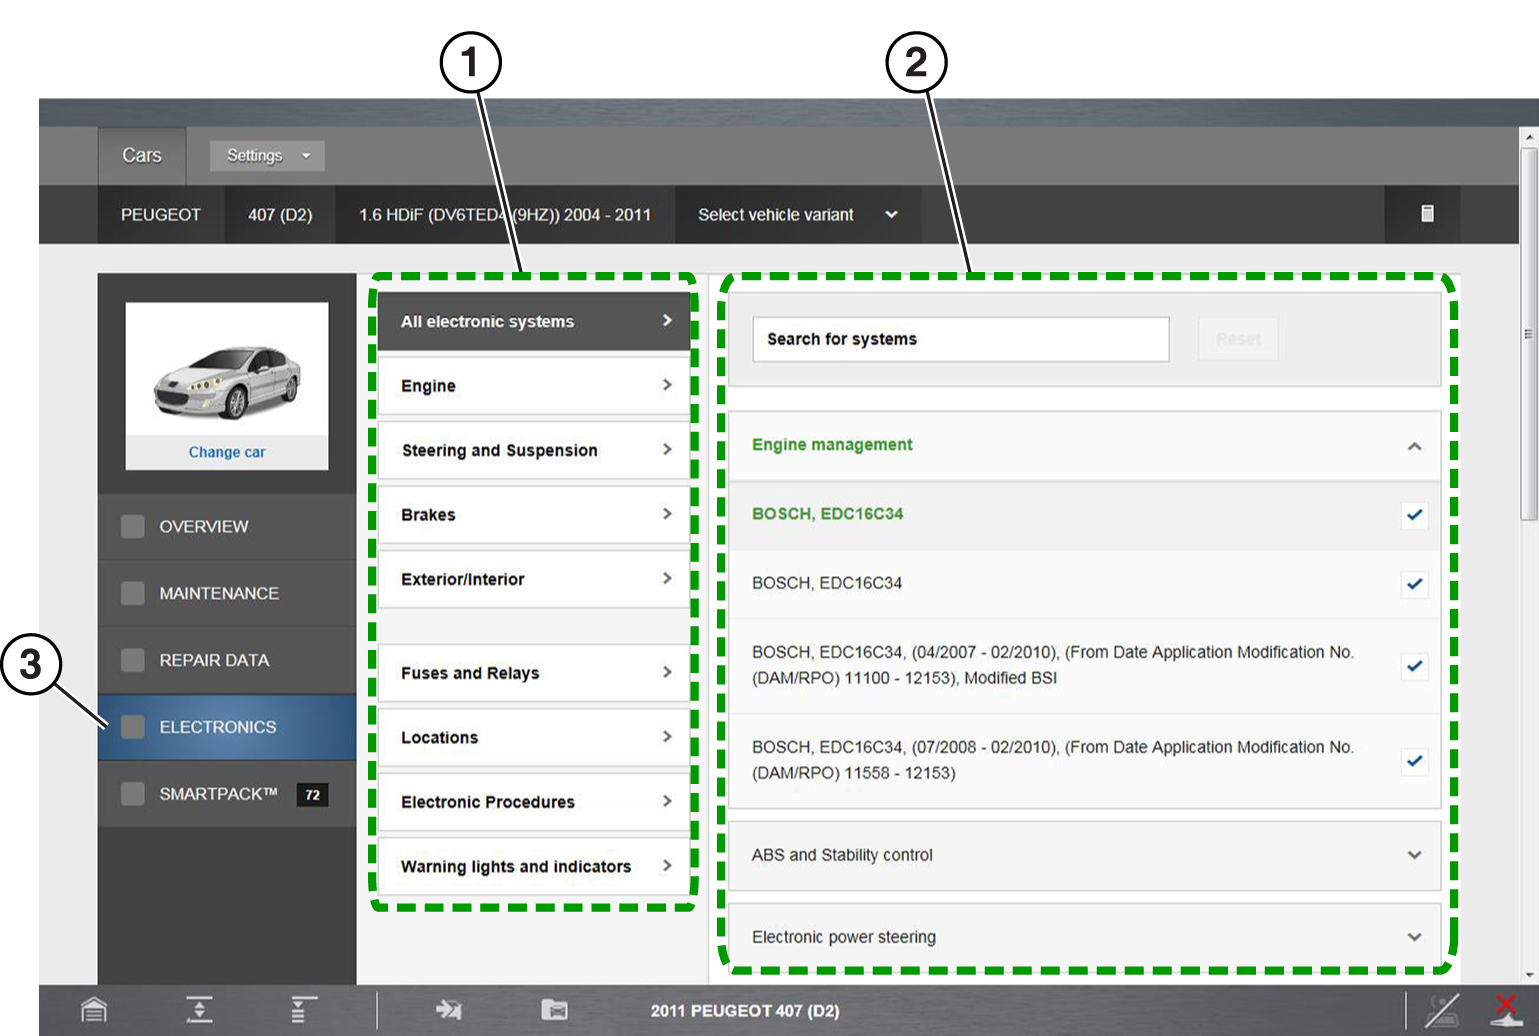
| 1. | Submenu Panel—contains available electrical information category options. Select a tab to view the results. |
| 2. | Options Window—displays either additional option choices, or results depending on the category selected. |
| 3. | Electronics Tab |
Electronic Systems can provide you with a summary of vehicle specific electronic systems diagnostic and reference data, by using selected filtering based on vehicle features and components. This ensures that the data results are correct for the specified vehicle.
Navigating the Electronic Systems tab:
| 1. | Select the Electronic Systems tab. |
| 2. | Choose the sub-menu system category. |
| 3. | Electronic vehicle system options are displayed in the options window |
| 4. | Choose the specific control system a system. |
| 5. | Scroll to the bottom of the options window and select the Continue to Electronics Systems button. |
The Electronic Systems screen is displayed. This screen includes the following function tabs:
| ● | Components |
| ● | CAN-Bus Overview |
| ● | Fault Code Diagnosis |
| ● | Locations Each function is described in the following sections. |

| 1. | Components Tab |
| 2. | CAN-Bus Overview Tab |
| 3. | System Component Results List |
| 4. | Fault Code Diagnosis Tab |
| 5. | Location Tab |
| 6. | Filter Results Field |
| 7. | List of All Systems |
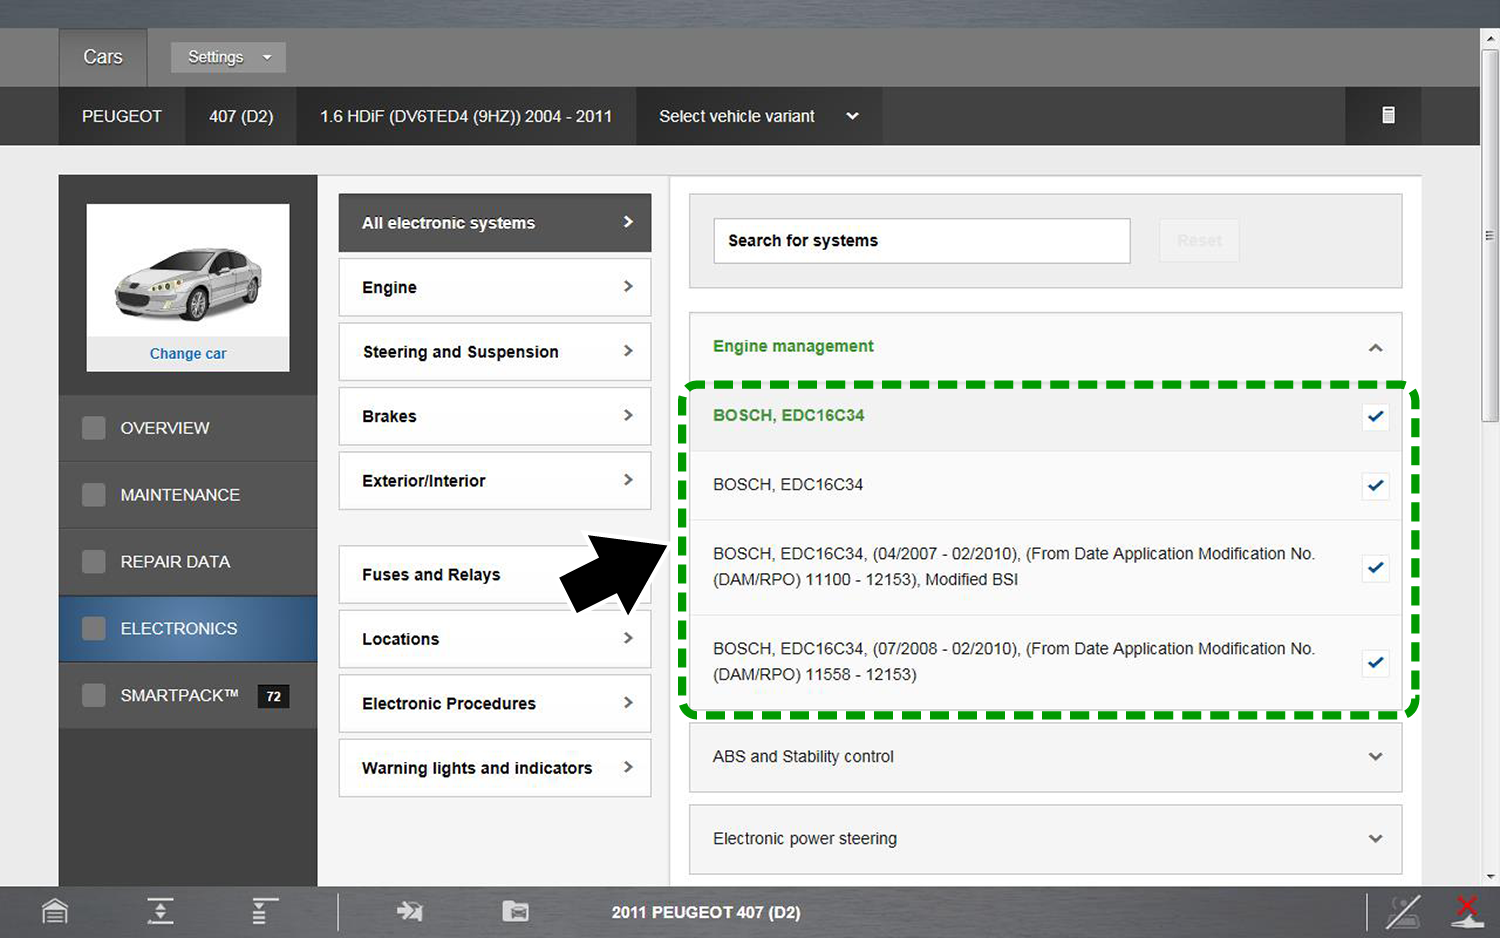
The Components screen provides detailed component diagnostic and reference information.
Selecting the Components tab displays:
| ● | a list of the selected control systems |
| ● | a selectable list of all the components used within all the vehicle systems To view specific component information, select a component from the list. |
Some diagrams may include “hotspots” (embedded links) on components, that are linked to related repair information or procedures.
The following is an example of some of the information found within the component information:
| ● | diagnostic step-by-step testing procedures (scheme) |
| ● | wiring diagrams • connector and pin identification |
| ● | component location |
| ● | component pictures and identification |
| ● | reference and initialization information |
| ● | specifications |
| ● | operation/theory information |
| ● | scope trace examples |
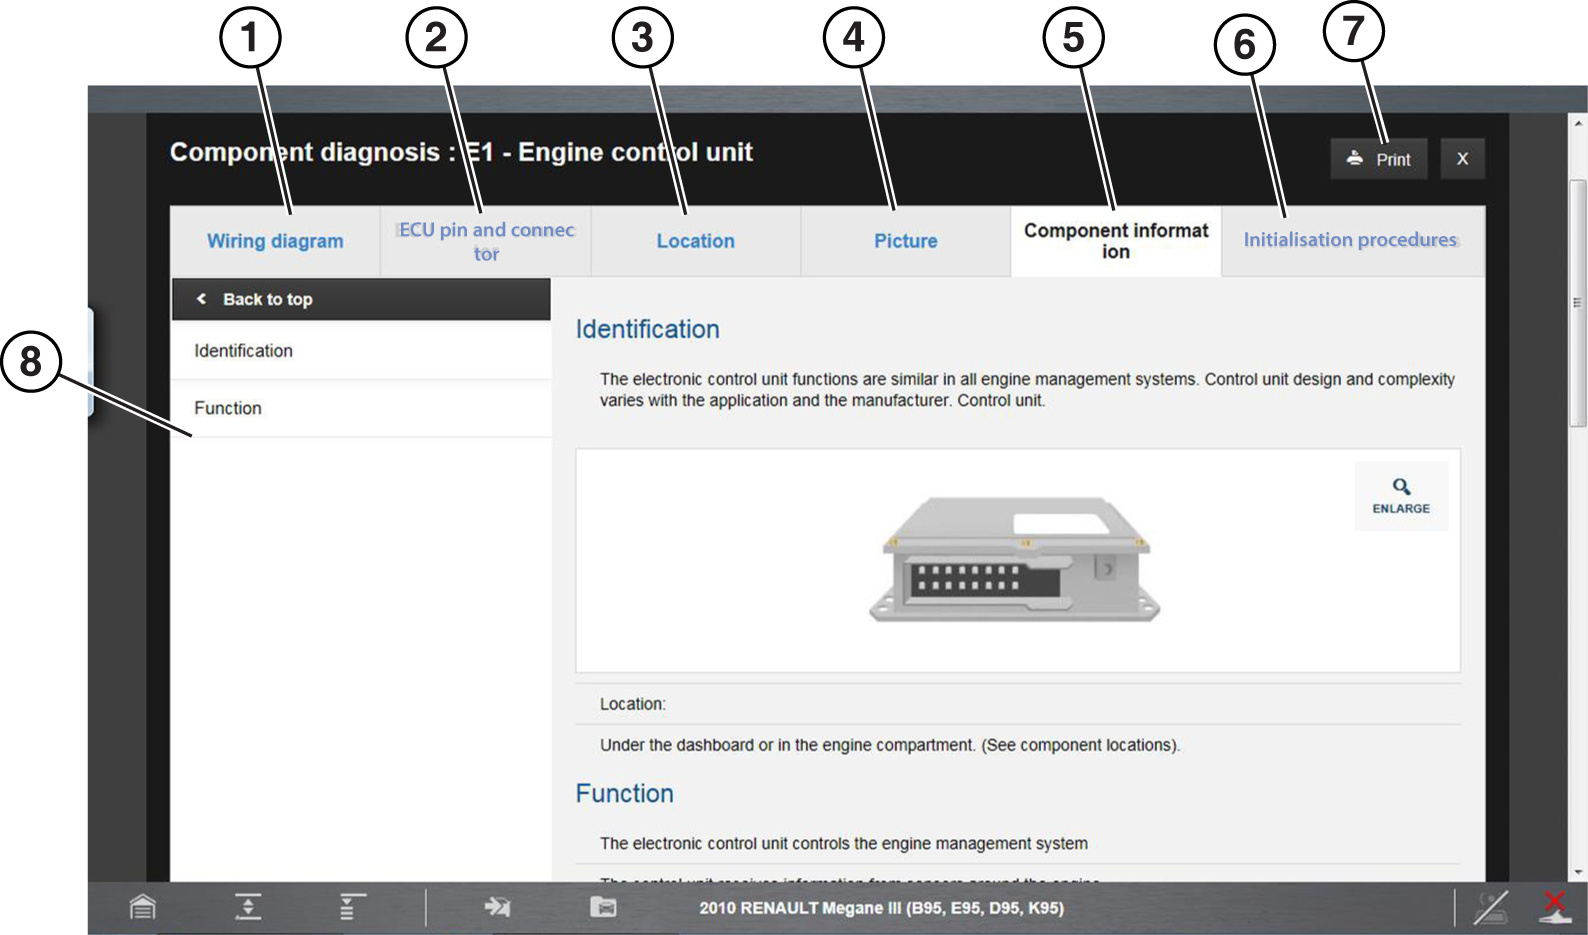
| 1. | Wiring Diagram |
| 2. | ECU Pin and Connector |
| 3. | Location |
| 4. | Picture |
| 5. | Component Information |
| 6. | Initialization Procedures |
| 7. | Print Icon |
| 8. | Diagnostic Testing Procedure and Diagram |
For a more detailed view of wiring diagrams, and images use touch screen pinch to zoom screen gestures to zoom in/out.
The CAN-Bus Overview screen provides detailed information about the components used on each Bus. A basic diagram of each Bus is provided to display the connected components/circuits contained within each Bus. Each component on the Bus diagram is selectable and linked to its own individual component information diagnostic screen. Select a component from the diagram to view the information.
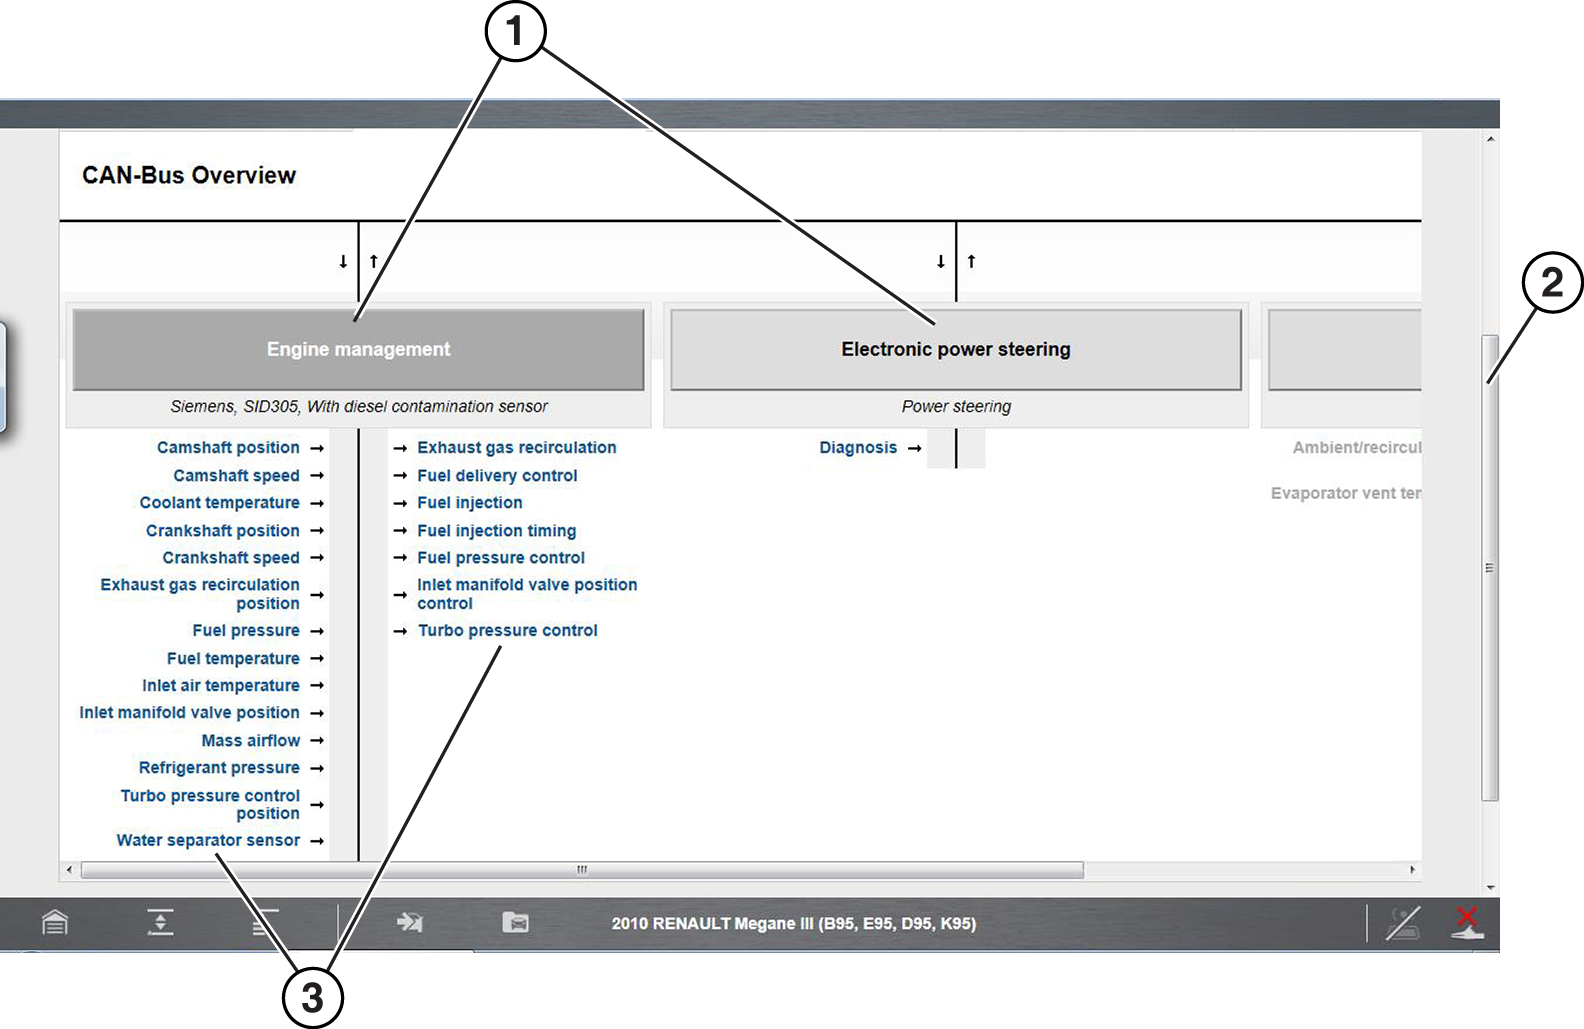
| 1. | CAN-Bus Diagrams |
| 2. | Scroll Bars (vertical and horizontal (not shown)) |
| 3. | CAN-Bus Components (selectable) |
Fault Code Diagnosis allows you to search for a specific DTC, and view related component information for diagnostic purposes.
Using the Fault Code Diagnosis Search Function:
| 1. | Select the Fault Code Diagnosis tab. |
| 2. | Enter a DTC into the search field. |
| 3. | If results are available, select a DTC to display related component diagnostic information and/or links. |
| 4. | Select the desired component to display detailed component information. |
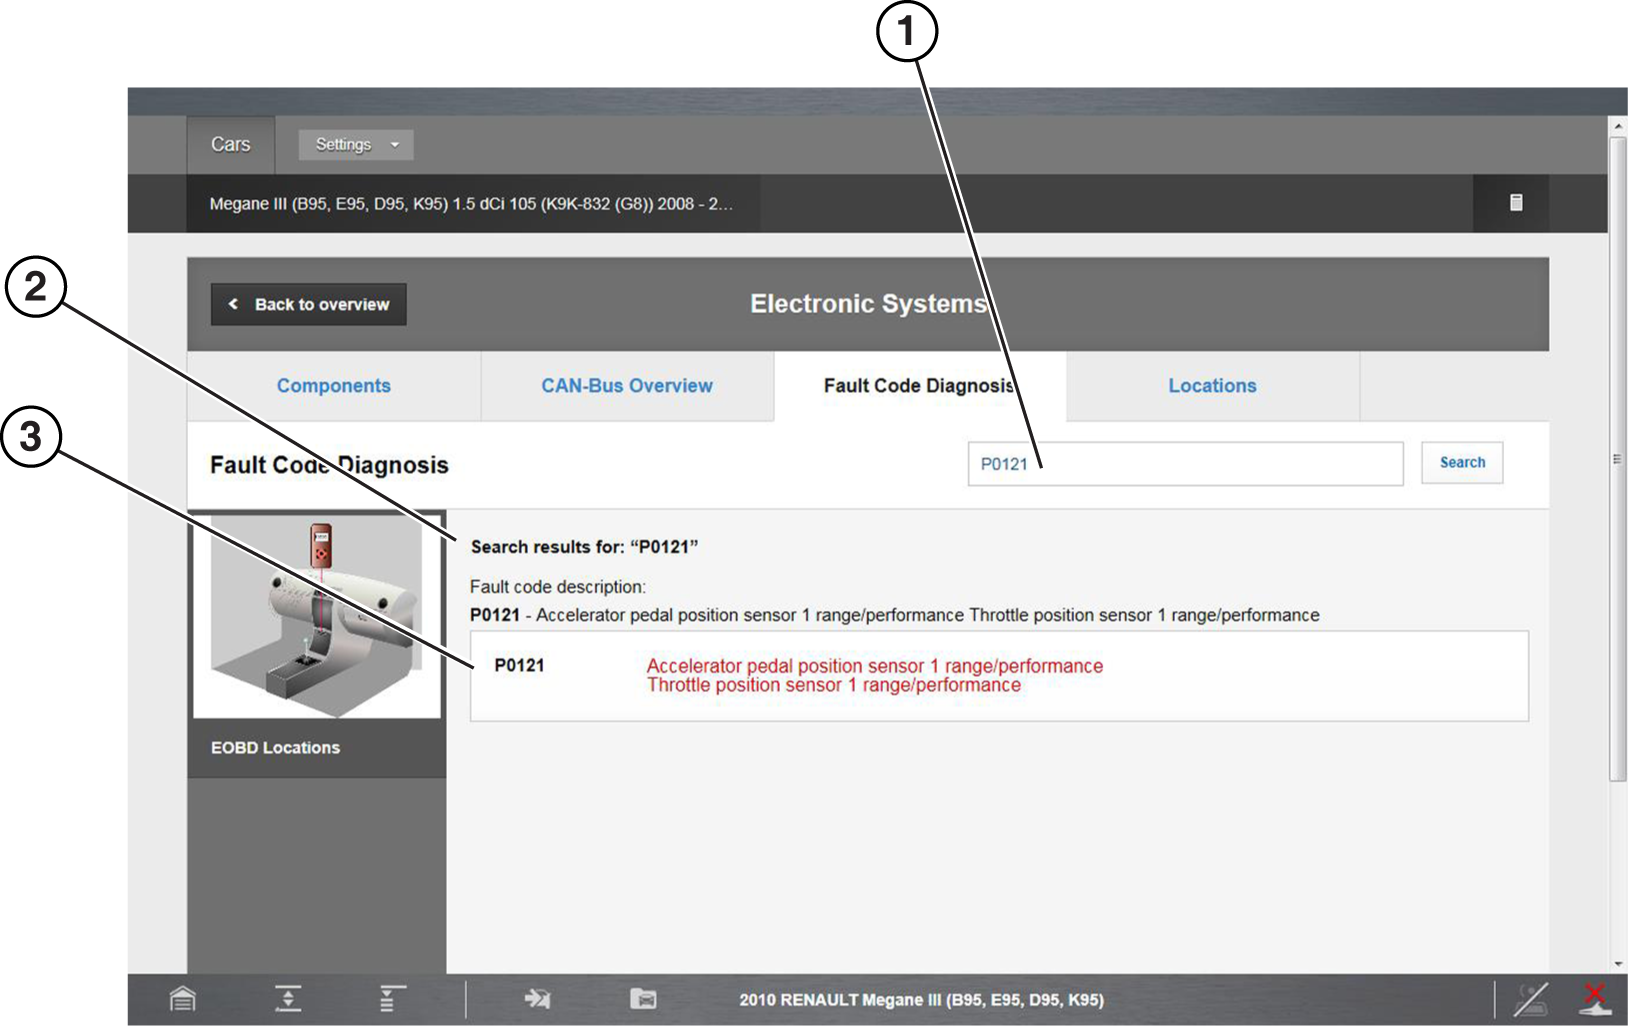
| 1. | Fault Code Search Field |
| 2. | Fault Code Results and Description |
| 3. | Fault Code Related Components (with selectable diagnosis links) |
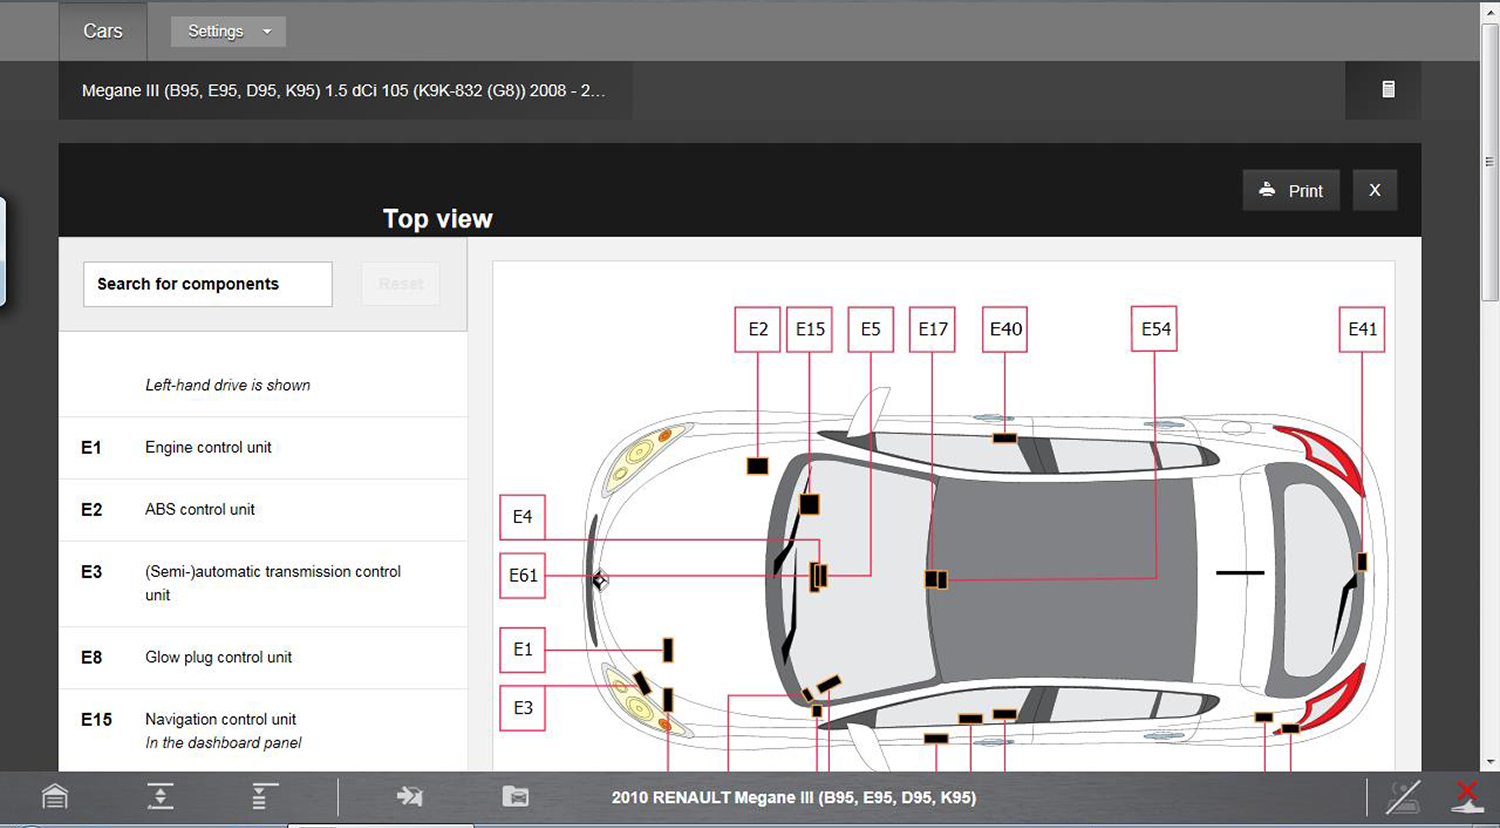
Locations allows you to quickly pick or search for specific component location. Components are categorized in the left menu panel and results are shown in the main screen. Filter your search either by selecting from one of the menu items or entering a keyword to search in the search field.
Using the Fault Code Diagnosis Search Function:
| 1. | Select the Fault Code Diagnosis tab. |
| 2. | Enter a DTC into the search field. |
| 3. | If results are available, select a DTC to display related component diagnostic information and/or links. |
| 4. | Select the desired component to display detailed component information. |
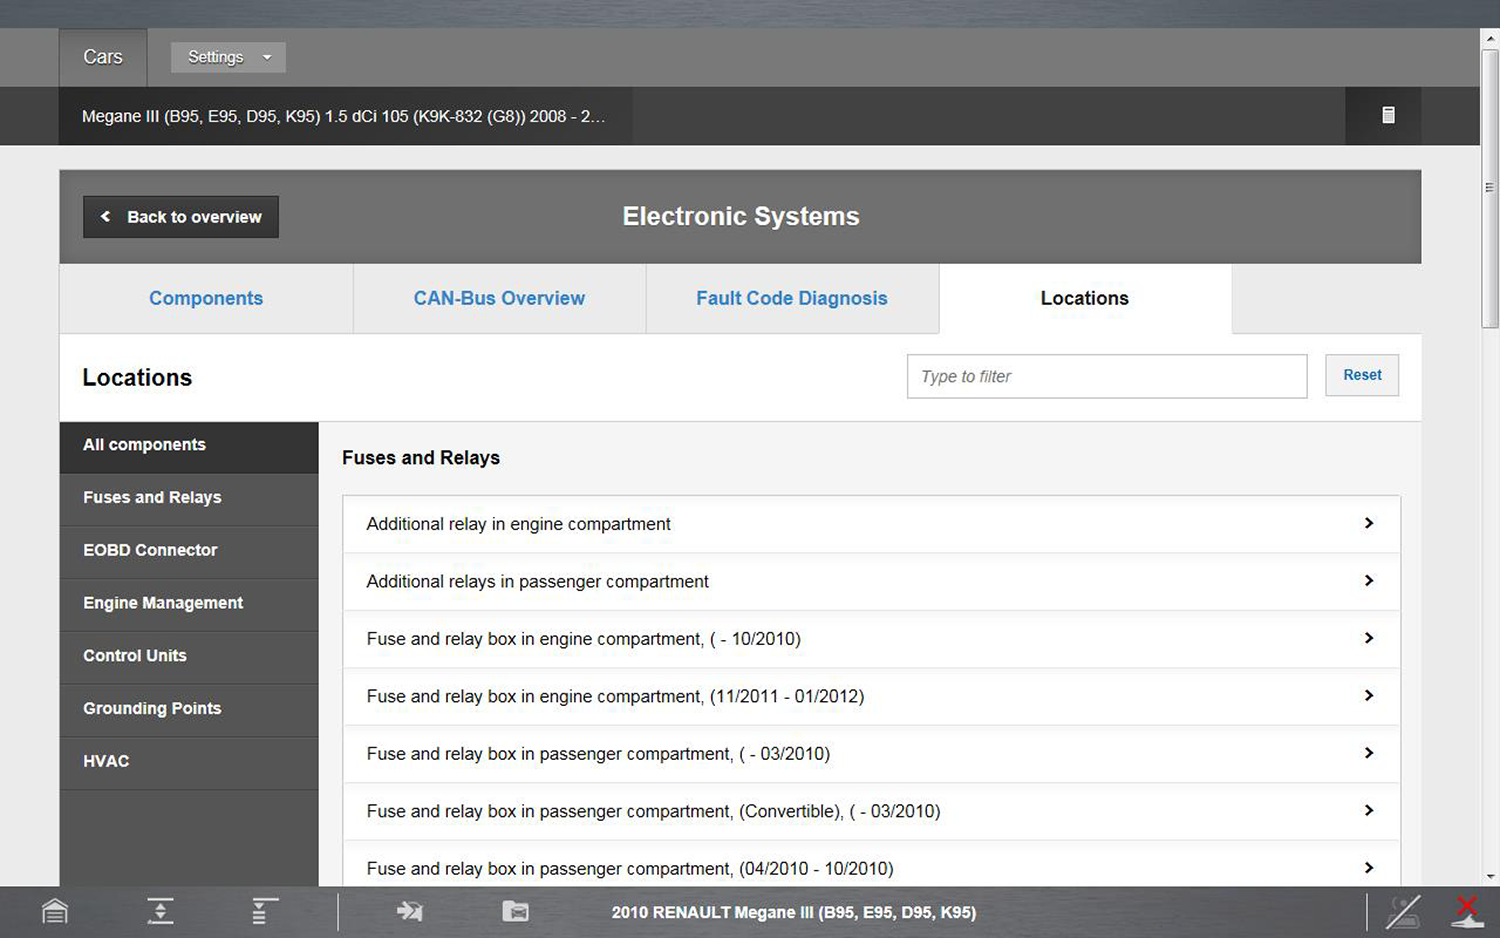
This feature provides vehicle specific fuse, relay and related power distribution component location information. Descriptive and visual (e.g. diagrams and schematics) reference may be provided.

The Locations features provides vehicle specific electrical component location information. Descriptive and visual (e.g. diagrams and schematics) reference may be provided for the following types of system components:
| ● | Fuses and Relays |
| ● | EOBD Connector |
| ● | Engine Management Control Sensors and Modules |
| ● | Climate Control (HVAC) Sensors and Control Modules |
| ● | Grounding Points |
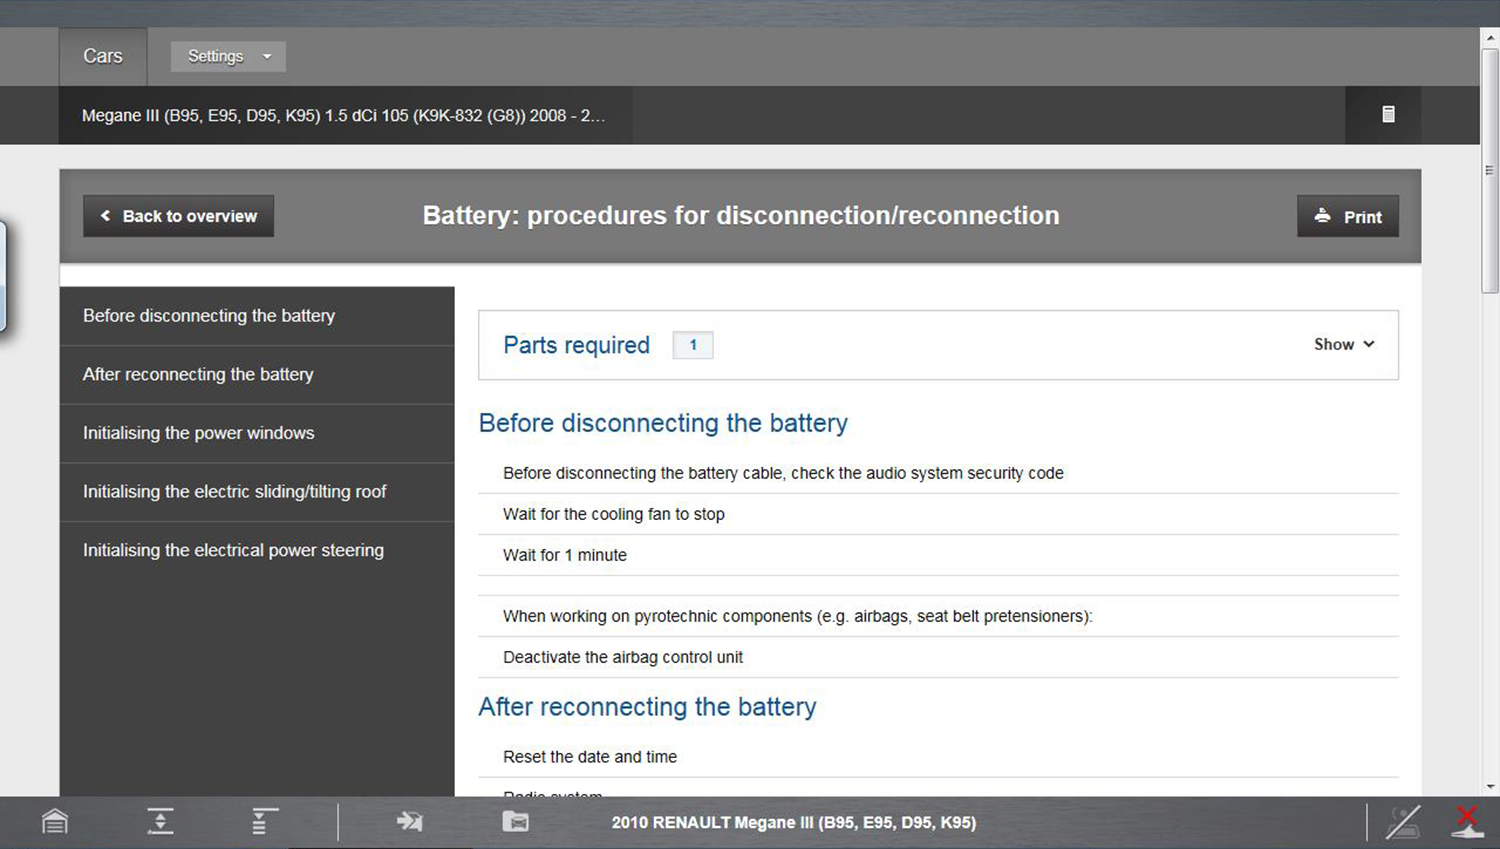
Electronic Procedures provides vehicle specific procedures for battery disconnection/connection, and reinitialization of electrical components or systems after battery connection.
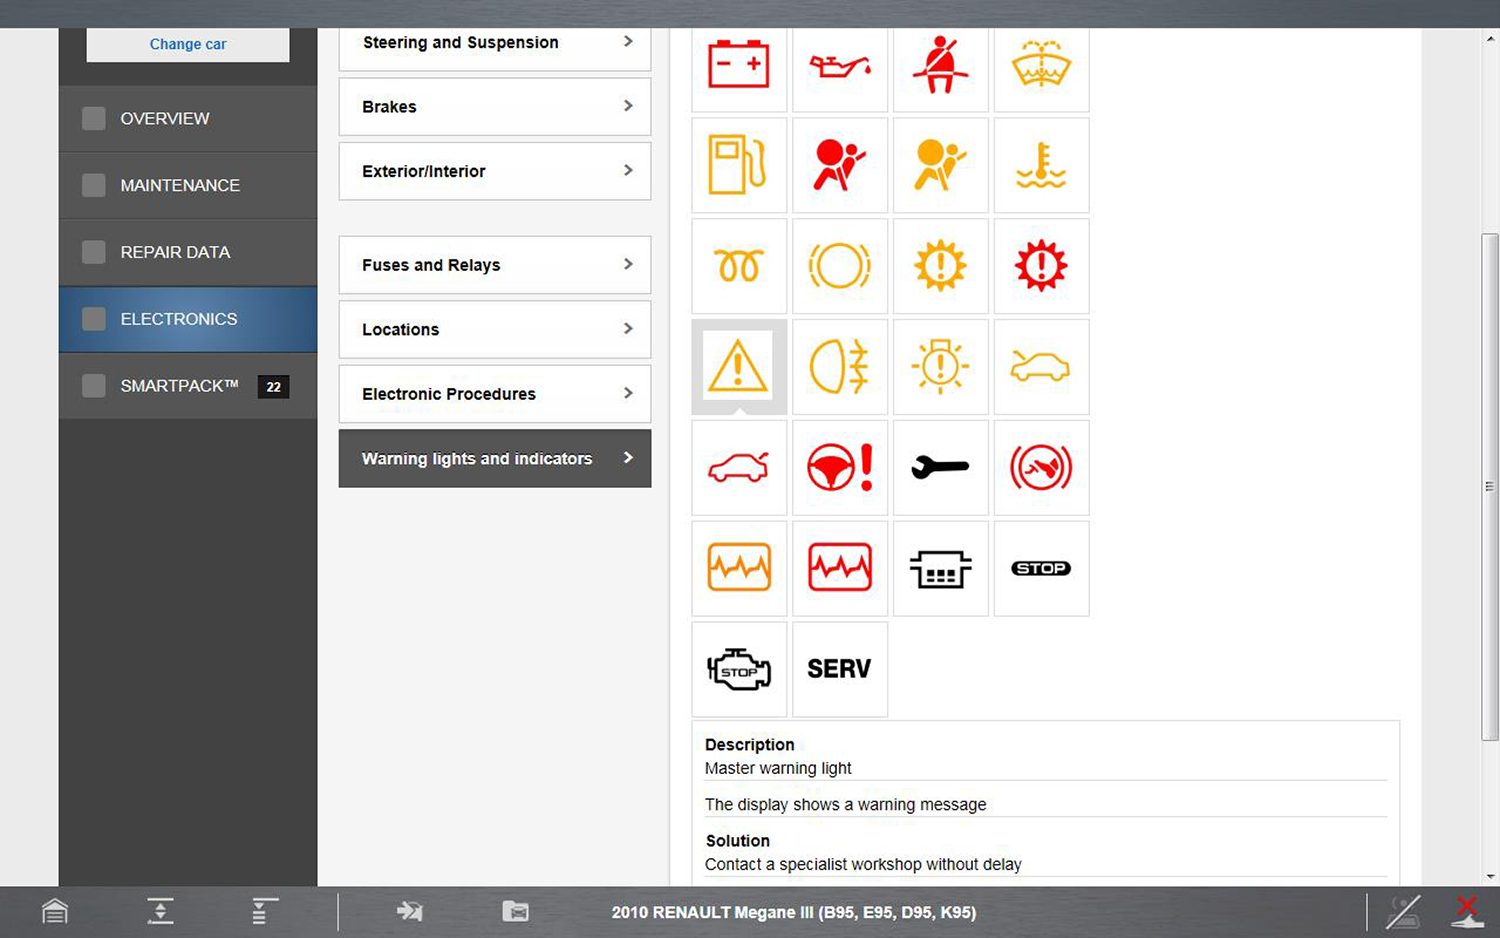
Selecting Warning Lights and Indicators, provides access to a complete visual list of dashboard warning symbols, including descriptions and actions required.
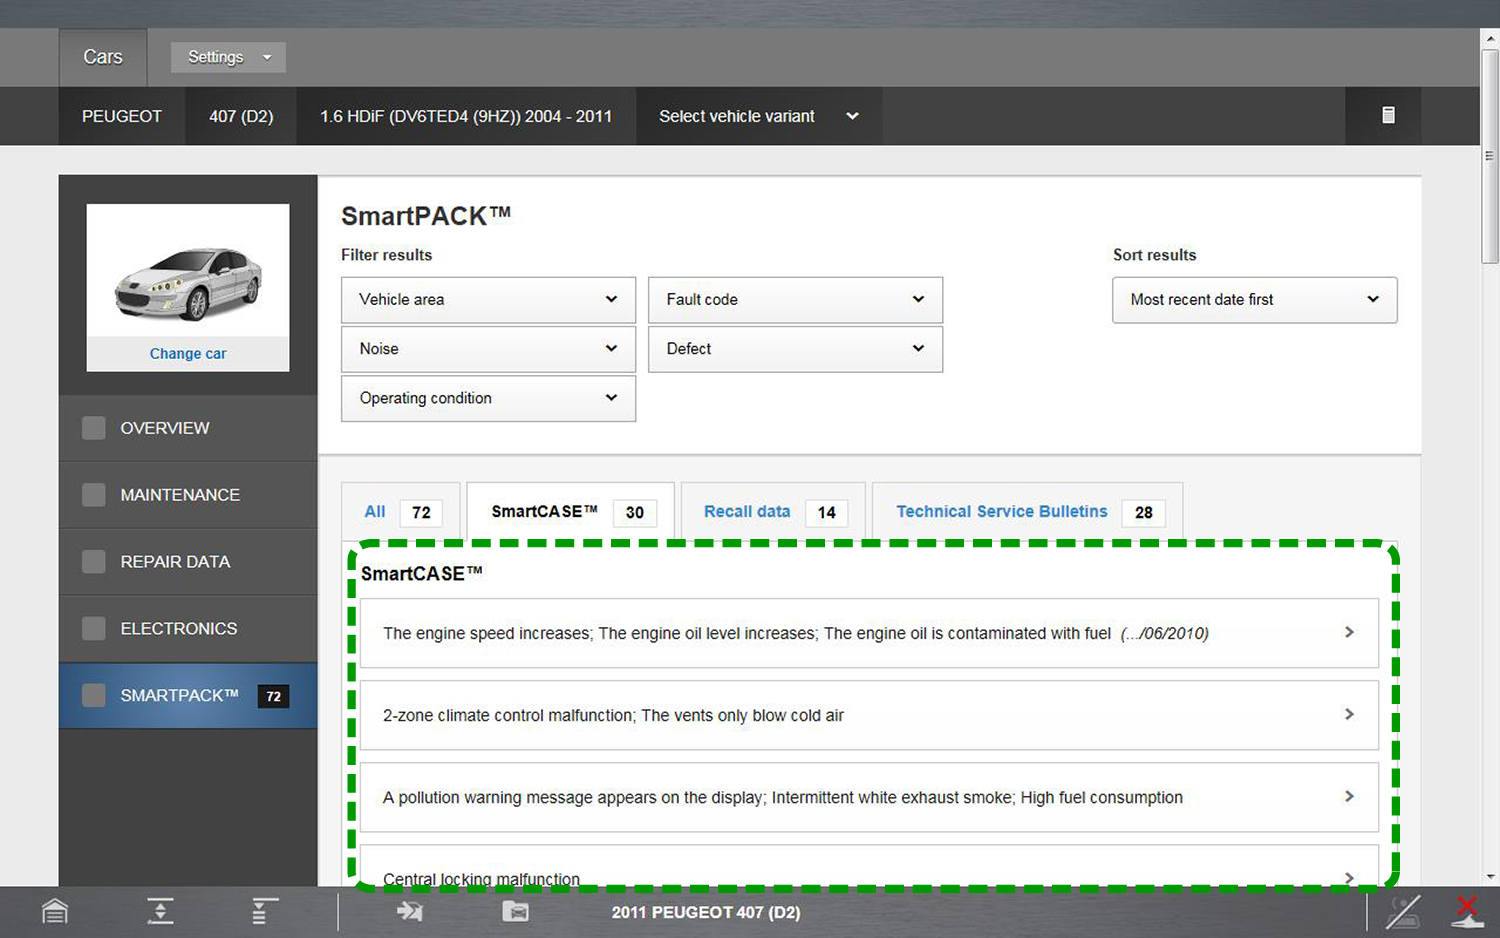
Selecting the SmartPACK tab, displays a tab summary view of all available vehicle TSB’s, Recalls and SmartCASE™ diagnostic and testing information. Each individual tab may be selected to view the applicable information.
To access the SmartPACK screen at anytime, select SmartPACK from the main menu panel.
Results may be filtered using the Vehicle Area and Fault Code dropdown boxes located in the upper area of the main screen. Select the dropdown box and select a choice from the displayed options.
The SmartPACK tab and the four main tabs (e.g. All, Recall Data etc.) include numerical indicators, to indicate the total number of records available.
The SmartPACK main screen feature locations are shown in the following illustration. The primary tab descriptions and functions are provided in the following sections.
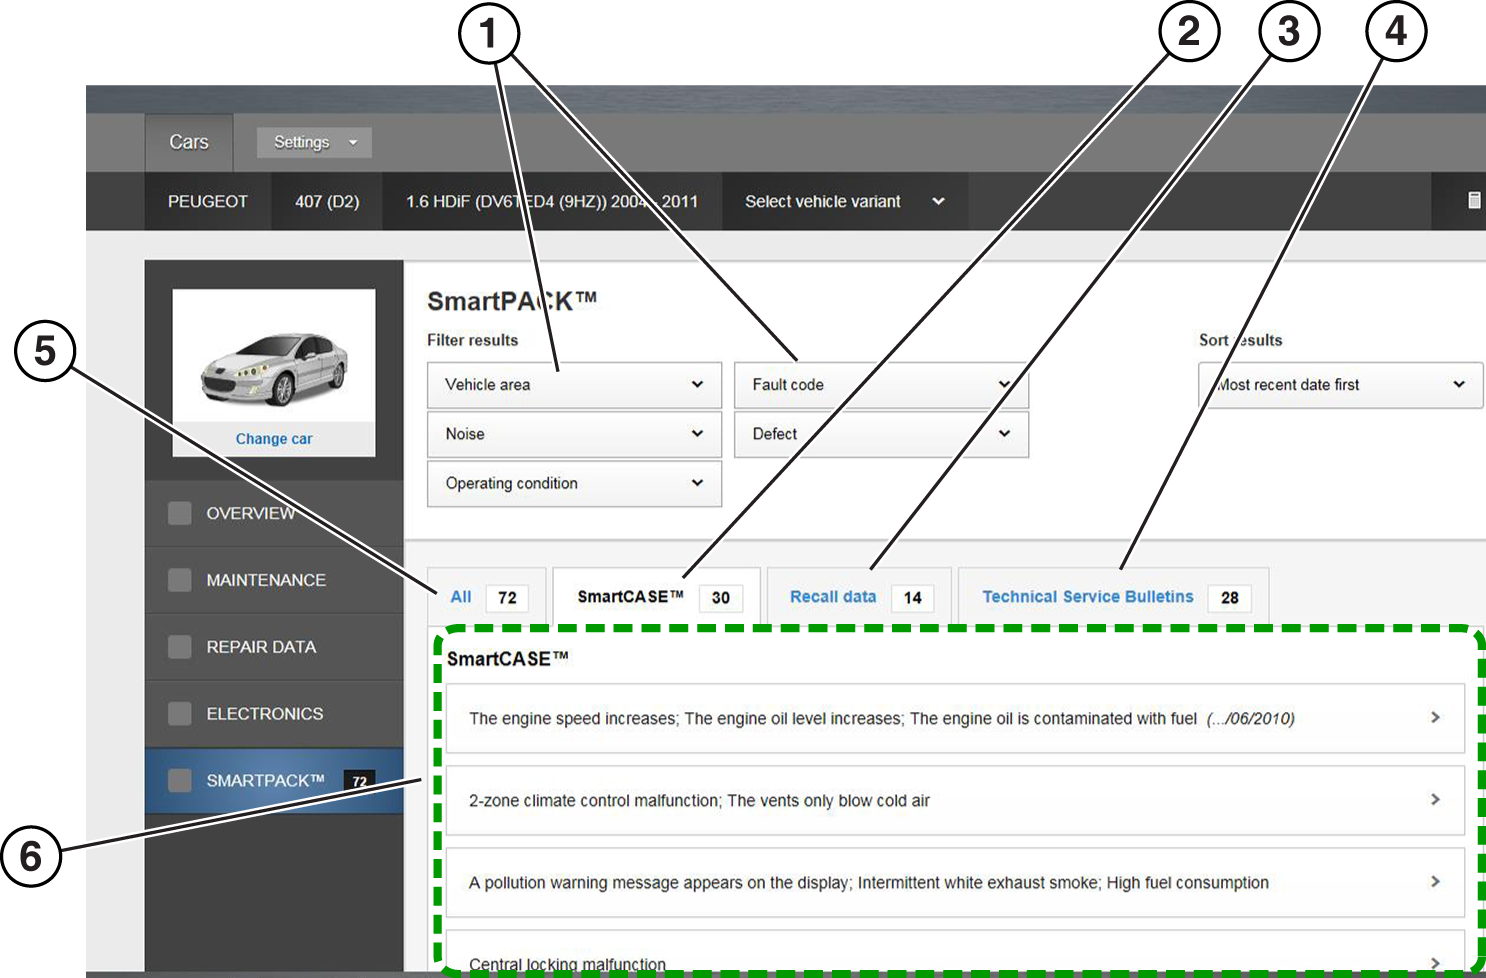
| 1. | Filter Results Dropdown Boxes—Vehicle Area and Fault Code criteria |
| 2. | SmartCASE Tab |
| 3. | Recall Data Tab |
| 4. | Technical Service Bulletins (TSB’s) Tab |
| 5. | All Tab—displays a complete selectable list of all SmartCASE, Recall and TSB information |
| 6. | Main Window—displays results depending on the category selected |
SmartCASE
SmartCASE is OEM-based technical (troubleshooting and repair) data for most European and Asian vehicles, sourced from industry experts. The data provided clearly describes technical problems, their causes and suggested solutions including verified fixes and tips.
Select a SmartCASE topic from the list of available topics to view detailed information about the problem including symptoms, causes, and solutions
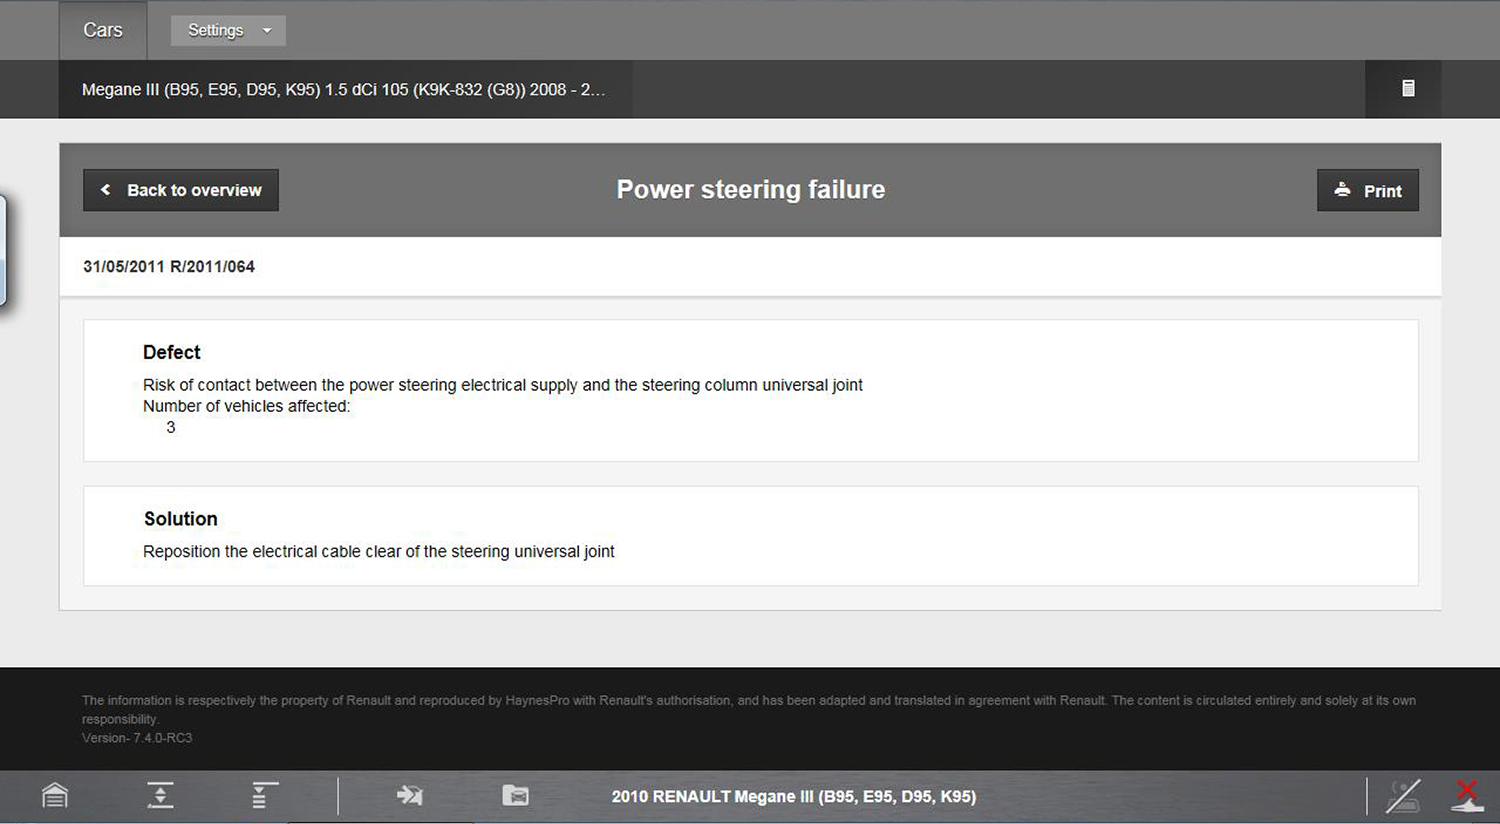
Recall Data
Recall Data is OEM provided vehicle specific safety recall information. Each recall record includes a description of the defect and the required solution.
In addition, related subjects may be available which may provide additional applicable information related to the recall.
Technical Service Bulletins
Technical Service Bulletins (TSB’s) are OEM provided vehicle specific service information. Each TSB record includes a description of the symptom and cause, along with solutions, required parts, and suggested repair times.
In addition, Related subjects may be available which may provide additional applicable information related to the TSB.