The vehicle must be correctly identified for the diagnostic tool to communicate, and display data correctly. Menus and navigation will vary by vehicle.
Depending on the vehicle, the vehicle identification process may require manual entry of the vehicle information, or it may be automated. The following three Scanner functions are available to identify the vehicle:
Instant ID - Automatically completes the identification process upon initial communication between diagnostic tool and the vehicle using OBD-II VIN mode $09. Instant ID requires specific vehicle support and procedures, see Instant ID (below) for additional information.
Auto ID - Automatically completes the identification process after the vehicle make and year are manually entered.
Manual ID - Allows for manual entry of all required vehicle identification criteria.
The following procedure applies to most OBD-II vehicles, and may vary depending on the vehicle. Not all vehicles support the Instant ID and/or Auto ID functions.
| 1. | Connect the data cable to the diagnostic tool. |
| 2. | Turn the vehicle ignition switch on. |
| 3. | Connect the data cable to the vehicle data link connector (DLC). |
On-screen cable and adapter connection instructions may be provided while using the Scanner and OBD-II/EOBD functions. The instructions may also include the location of the vehicle DLC..

Vehicle connection data cable message
| 4. | If the diagnostic tool is off, when the OBD-II data cable is connected to the vehicle DLC, the diagnostic tool should automatically turn on. If the tool did not turn on when the data cable was connected to the vehicle, check the vehicle DLC for power. Most OBD-II vehicles supply power to the DLC, which in-turn supplies power and turns on the diagnostic tool when the cable is connected. |
| 5. | If required, turn the diagnostic tool on. |
| 6. | Depending on the vehicle: |
| a. | Instant ID may occur, as indicated by an audible "beep" approximately 6 seconds after boot-up. Select the Scanner icon, then wait for the vehicle confirmation screen and select OK to continue. Then proceed to step 6. See Instant ID‚ for additional information about this function. |
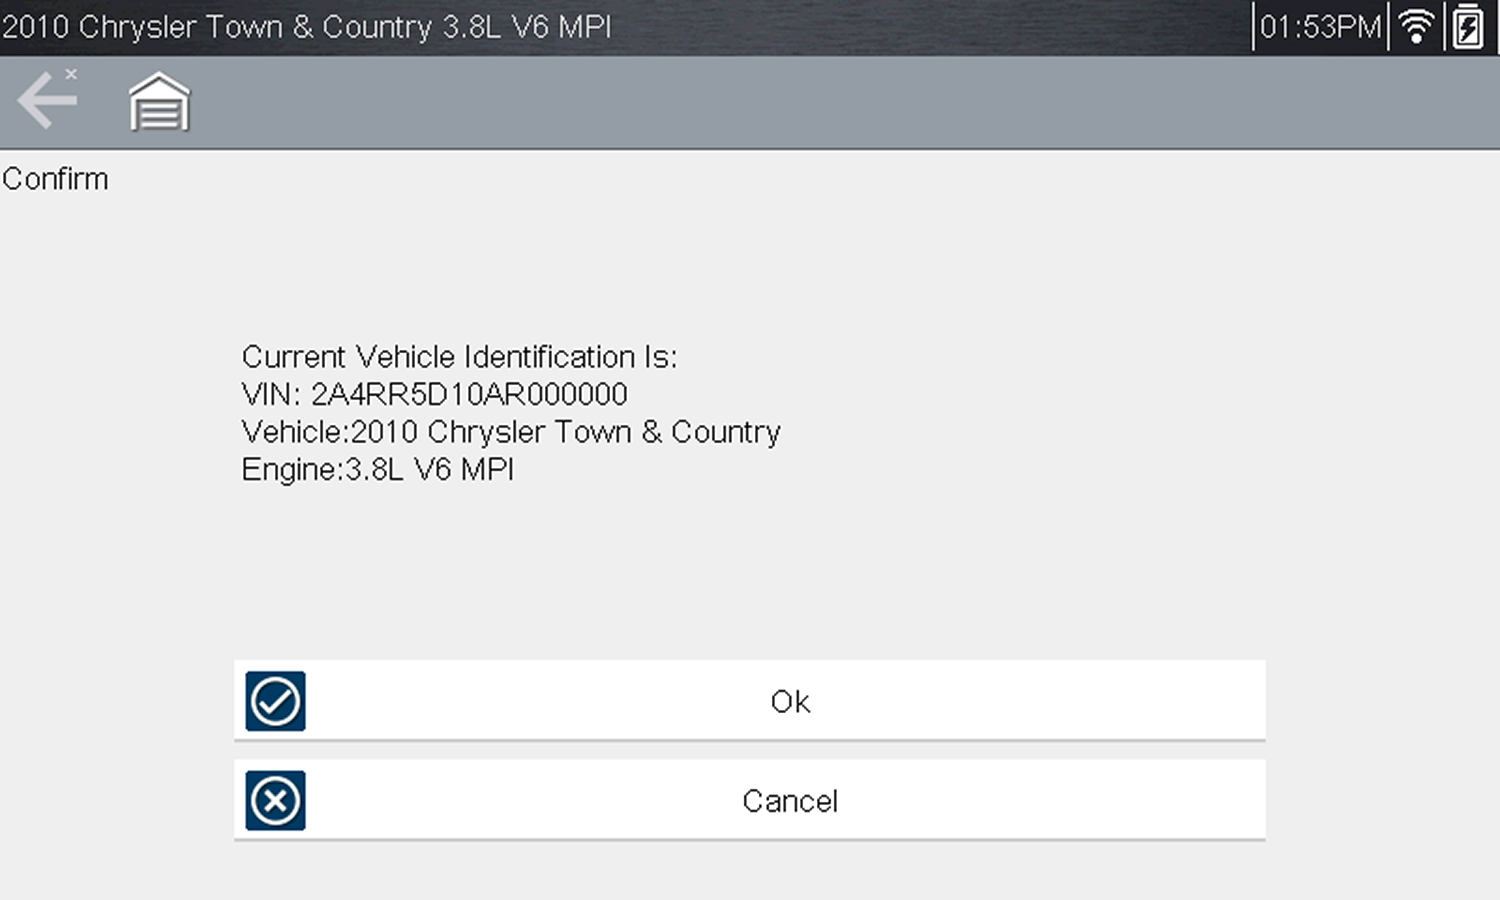
Vehicle confirmation screen
| b. | If Instant ID is not supported, you will be prompted to select the vehicle make and year (If needed). Then a menu option is displayed to choose either Automatic ID or Manual ID. |
| ● | Selecting Automatic ID (If supported by the vehicle) will briefly display a communications screen informing you that the diagnostic tool is attempting to establish communication with the vehicle and determine vehicle identification. Once the vehicle has been identified, the vehicle confirmation screen displays. If the vehicle information is correct, select OK to continue, then proceed to step 6. If the vehicle does not support Auto ID, the diagnostic tool will attempt to identify the vehicle and then display a message indicating that vehicle identification cannot be made. If this occurs, proceed to “Selecting Manual ID” next. |
| ● | Selecting Manual ID allows you to manually enter all the vehicle information to identify the vehicle. Follow the screen prompts to enter all the information required to identify the vehicle. Once the vehicle has been identified, the vehicle confirmation screen displays . If the vehicle information is correct, select OK to continue, then proceed to step 6. |
| 7. | After the vehicle is identified, a menu of available systems, and options are displayed. Select a system or option. |
Only the systems and options supported for the vehicle are included in the menu list.
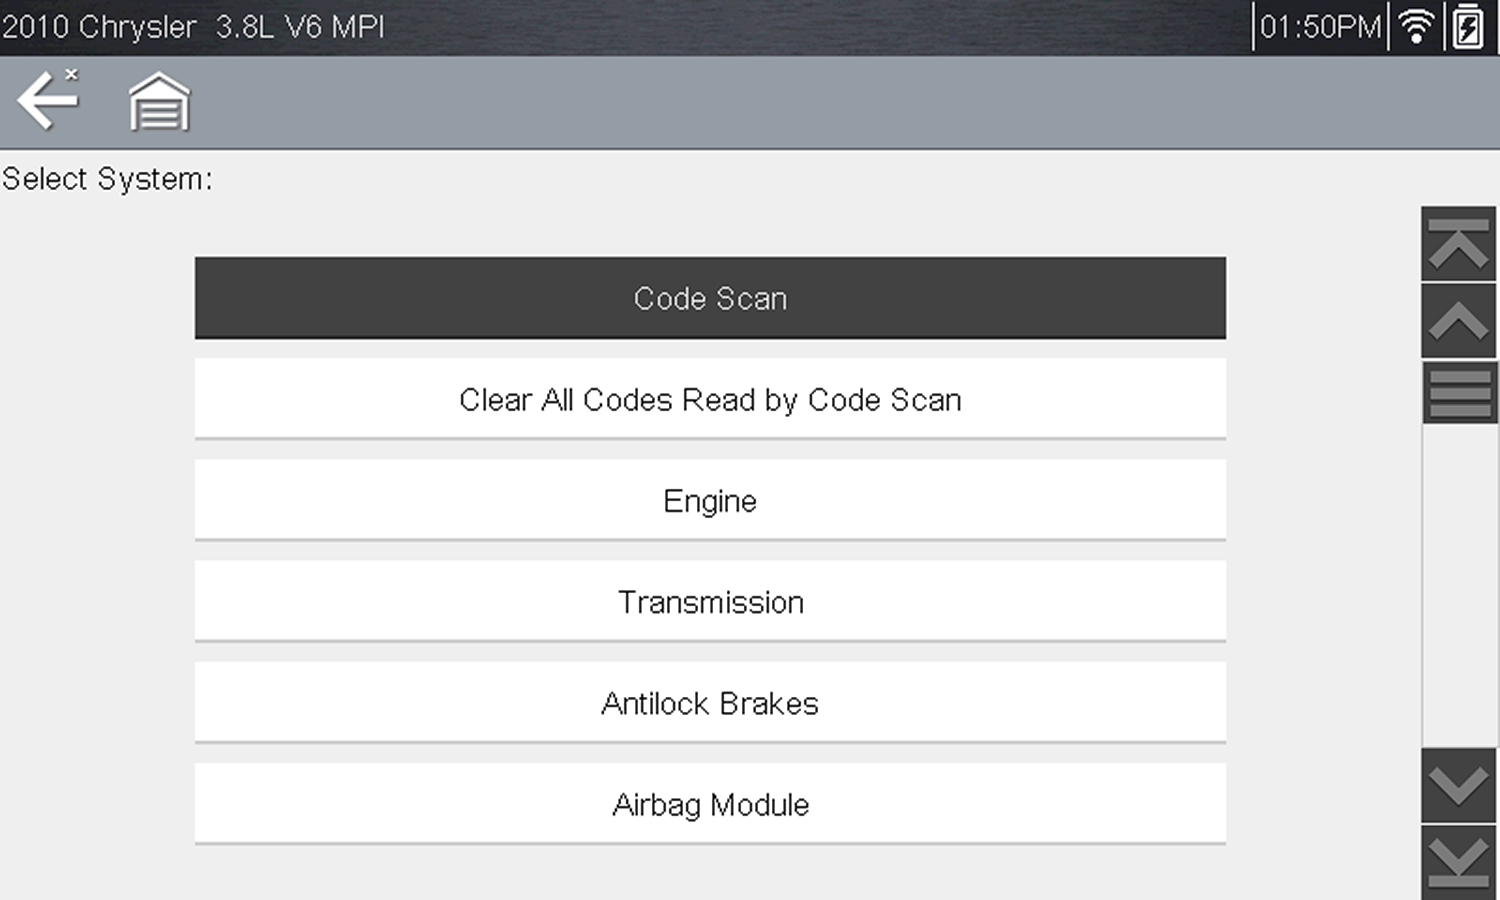
If a system (e.g. Engine, Transmission, Antilock Brakes, etc) is selected, the diagnostic tool may establish communication with the vehicle, then display the system main menu (available tests). For sub-menu option information, see System Main Menu Options.

The Instant ID function, can save time when initially identifying a vehicle, by automatically communicating with the vehicle to complete the vehicle identification process.
This function requires specific vehicle support requirements, and connection procedures to operate.
| ● | Vehicle requirements: |
| – | Vehicle must support Mode $09 VIN. |
| - | Note:Mode $09 VIN is mandated on 2008 and newer vehicles. |
| – | Vehicle must be equipped with Hi Speed CAN or J1850 communication protocol. |
| ● | Connection procedure requirements: |
1.) Turn the vehicle ignition on.
2.) Connect the data cable to the diagnostic tool.
3.) Connect the data cable to the vehicle data link connector (DLC).
4.) The diagnostic tool should turn on automatically. If required, turn the diagnostic tool on.
An audible "beep" will sound approximately 6 seconds after boot-up, if the VIN is read.
Note:No visual confirmation is displayed.
5.) Select Scanner.
When Scanner is selected, a screen may briefly appear informing you the diagnostic tool is attempting to automatically complete the vehicle identification process.
6.) After the vehicle has been identified, the vehicle confirmation screen displays. If the vehicle information is correct, select OK to continue.
Depending on the vehicle, Instant ID may occur automatically and only ask you to confirm the vehicle, or additional screen prompts may be displayed to enter vehicle information.
If the Scanner feature is exited during the session that Instant ID was used, selecting Scanner again, will not ID the vehicle again. To quickly ID the vehicle again, select it from Previous Vehicles and Data > Vehicle History.
If the vehicle is not automatically identified, follow the screen prompts to enter the information required to identify the vehicle.
Alternative Vehicle Identification
Occasionally, you may try to identify a test vehicle that the Scanner does not recognize, the database does not support, or has some unique characteristics that prevents it from communicating with the Scanner. In these instances, there is an alternate choice that allows you to establish communication with the vehicle:
| ● | OBDII/EOBDFunction—this function allows you to connect to the OBDII equipped vehicle and perform basic OBD-II or EOBD diagnostic functions, see OBD Training Mode for additional information. |


