I spent the weekend shovelling mulch, two truckloads in fact. The job had risen to the top of my honey-do list. I couldn’t put it off anymore without risking a heavy frost killing my wife’s flowers and bushes. As I prefer a happy wife, I shovelled a ton of mulch, literally.
Shoveling mulch is a mindless task so it gave me time to think. So, I thought about this article I would start writing today. In doing so, I pondered the first word in the title, “guide”.
I decided that all things in life are better when you have a good guide. Good Guide? That would infer the possibility of a bad guide, wouldn’t it? I've had a bad guide once. Probably more than once, but this one haunts my memory.
It was a written assembly guide on how to put together a barbeque grill. Sounds simple, doesn’t it? First off, it was a four-burner gas grill with an attached charcoal grill, an offset smoker box on one end, and a sear burner on the other. It came in, what seemed like, a million pieces. The guide was printed in a dozen languages, so it was the size of an old Yellow Pages back in the 80's. The guide was awful, and the pictures didn’t even look like the components. The verbiage did not make any sense at all. I quickly decided that I would be better off on my own, so I tossed the guide and winged it. It took all day. I would install a part, then four steps later have to remove it to make way for something else. By the end, it felt like I had put it together and taken it back apart at least a half a dozen times. And yes, I had leftover parts. But it worked and has cooked many steaks, ribs, and hamburgers over the years, and I have only had one shelf fall off during that time. Luckily, I saved those leftover parts.
If I had had a good guide, I would have spent a third of the labor time. I would have enjoyed the grill assembly instead of being stressed out. Not to mention I would have had that first steak a lot sooner.
A good guide can make processes more efficient, more productive, more successful, or more profitable (and sometimes all of the above). Just look at the definition of the word guide, according to Oxford Languages.
guide/ɡīd/
verb
1.Show or indicate the way to (someone). "He guided her to the front row and sat beside her".
So, given a choice, I will always choose a good guide to help me be more efficient, more productive, and more profitable in the working world.
That brings us to the topic of this article, now. Guided component tests provide a high level of efficiency, productivity and profitability. Those big three benefits happen because of the first word, Guided.
Let’s think about our two types of diagnostic tools – scanners and component testing. The scanner, which is like a nice compass, shows the technician which direction to look for the problem. It shows them where they need to look. Component testing is then used to pinpoint the cause of the issue. Guided Component Tests takes the scope and other meters that make up component testing and make it simple to use. That’s where it guides the user on how the component works, how to hook it up, where to hook it up, and what it should look like. Each test has this expert guide that essentially provides “on-the-job training”. There are over 7 million guided tests available; or should we say, “over 7 million on-the-job training sessions” available, with the guide being the teacher.
Other diagnostic tools out there may offer some level of component testing, but none of them have “Guided” component testing. So, at writing this, Guided Component Tests are only available from Snap-on.
In this case study, we are going to be diagnosing a 2019 Jeep® Grand Cherokee®, so in addition to component testing, we need to review Security Link™.
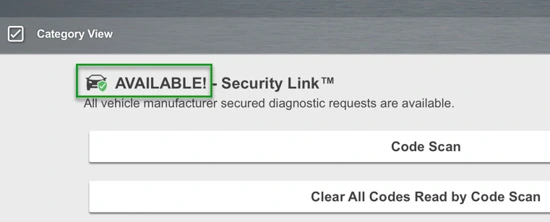
Automobile manufacturers are developing solutions to protect their vehicles’ networks from unauthorised access, including potential cyber-attacks. For those vehicles with secure systems, access to certain diagnostic functions may require registration and authentication through an approved device for all aftermarket scan tools. A great example is FCA (Fiat Chrysler Automobiles) Secured Gateway.
This is changing the way that scan tools need to work. This is where the Snap-on® Security Link comes into play. The best way to avoid getting caught without access to these vehicle systems is to make sure your scan tool is running on the latest software.
If your Snap-on tool shows a message like the one below, then you have limited access.
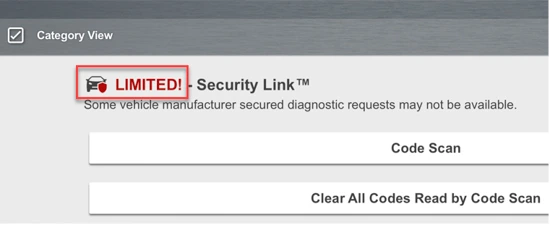
In this case, your tool is allowed to read codes and data only. You will need to register and authenticate your tool.
If you have a Snap-on® tool, see Security Link™ | United Kingdom (snapon.com) to learn how.
Let’s get back to Guided Component Tests and the on-the-job training classes. Along with those valuable, 7 million+ expert guided, vehicle specific tests, there is even more guidance available.
Another exclusive feature of Guided Component Test is over 60 training classes covering topics such as basic electronic components, an ADAS class, a brushless DC motor class, an evaporative emissions class and many more classes embedded in the tool.
How convenient is it to take a class on demand and when you need it? Back in the day, I took every class I could. I remember one where I travelled 5 hours to attend a 2-day course on rebuilding computer-controlled carburettors, (C3 systems from GM®). It required 3 nights in a hotel, meals, miles and I believe the tuition was $600 (approx. £470) in 1980’s money! According to Google®, that would be the equivalent cost of $2,238 (approx £1,760), in today’s currency value. Wow! I sure wish I had embedded classes in my scan tool to teach and guide me through the job. I would have saved a lot of money! It is funny how some folks call that the good ‘ole days', but is it really? The good ‘ole days are right now, if you have a good guide!
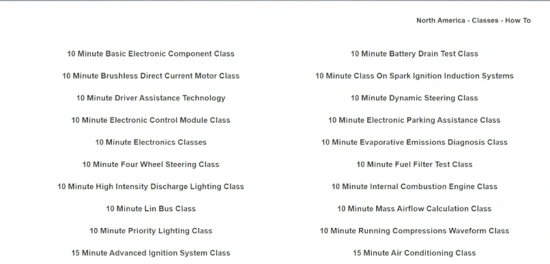
Here's a sample of some topical classes offered out of a total of 63.
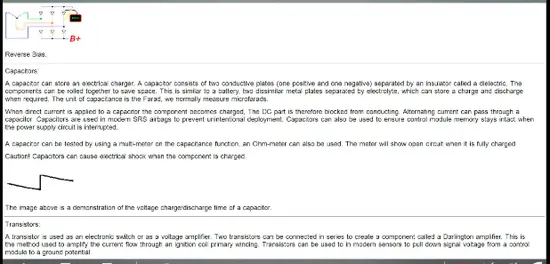
I have regretted not taking an electronics course early in my career. Let’s look at the basic electronic component class. As you see, it starts off with semi-conductors and diodes, and as you scroll down it takes the class all the way to capacitors and transistors.

OK, so let’s get to work on this 2019 Jeep Grand Cherokee. The customer complaint is that it runs rough, especially when accelerating, and the check engine light is on.

The very first thing to do is to educate the customer about the diagnostic charge to pinpoint this problem.
Just a parenthetical set of questions for garage owners:
1. When was the last time you evaluated your diagnostic charges?
2. Is it enough to compensate your technicians well enough to secure their long-term employment?
3. Is it enough to cover your investment in equipment and information to do the job?
4. Is it enough to allow for a reasonable profit?
Ok, the job is sold and we will start with a pre-scan to point us in the right direction.
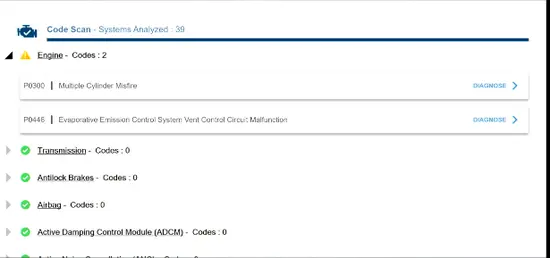
We have two codes: Misfires and Evap.
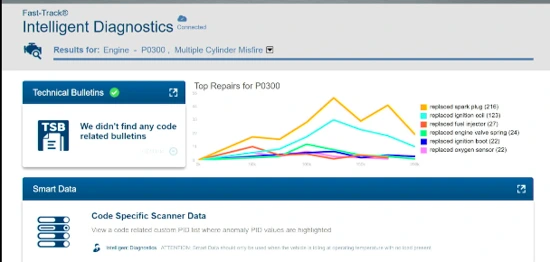
If we press the diagnose button on the P0300 description bar, we go to Fast-Track® Intelligent Diagnostics. Fast-Track Intelligent Diagnostics provides a highly efficent workflow, that helps you to move through the diagnosis and repair quicker. By filtering all of the data and tests down to only what is relevant for that specific vehicle and trouble code.
A great example of this is Technical Service Bulletins (TSB’s), as shown below. This vehicle has 38 TSB’s. None of them have any relevance to this trouble code. How much time did I save by not needing to look at 38 TSB’s?
We also see that the top three repairs for this vehicle with this trouble code are:
1. Replace spark plugs
2. Replace ignition coil
3. Replace fuel injector
I would say we have a pretty good direction to go next. Can we narrow down the problem cylinder?
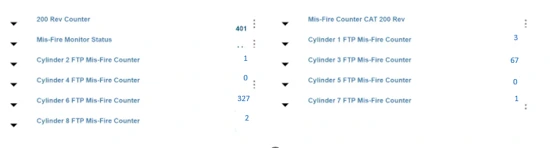
Fast-Track Intelligent Diagnostics shows only the relevant functional tests available as well. Jeep has a misfire counter very similar to GM. They aptly named it “which cylinder is mis-firing?"
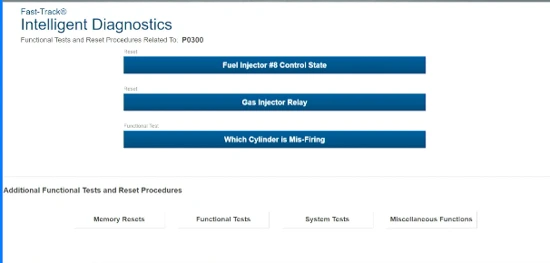
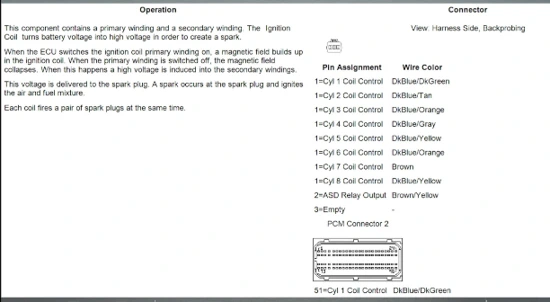
It looks like we have a problem with cylinders 3 and 6. To verify, we will go to Guided Component Tests and test the coils and injectors on those cylinders.
Unless we are extremely familiar with this vehicle and system, I recommend always letting the guide teach you about this system’s operation and connector layout. This could save you a lot of time chasing down the various circuits in a wiring diagram.
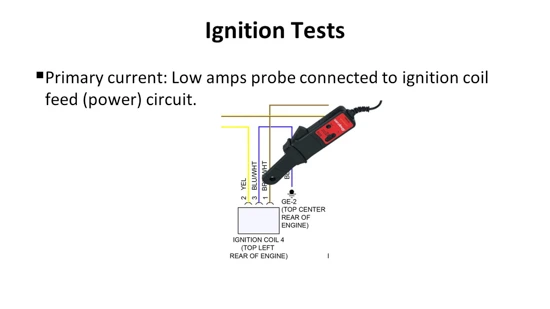
After you have had a little on-the-job training on the operation of the system, the guide will show us how to hook it up. We will be looking at amperage to determine the integrity of the coil. I prefer the low amp probe when possible because it is non-intrusive to the circuit and it is easier to hook up in most cases. Plus, it really shows the work being done where voltage cannot. It simply is hooked around the wire that powers the circuit as shown in the picture below.
Sometimes the component is buried and to get to it will require disassembly. Our guide comes to the rescue again by showing a tip to remove the fuse for that coil and install a fused jumper wire, then attaching the amp probe to that.
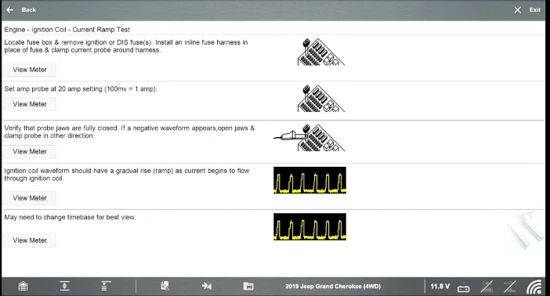
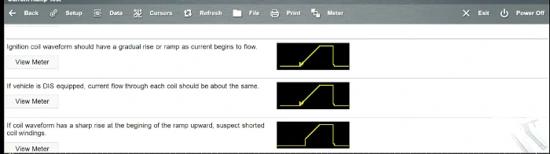
The guide has us hooked up and ready to test. I can view the meter and the guide at the same time as shown below. This allows us to compare the live pattern with the sample patterns. It guides me to what is good and bad. If both coils on the suspected cylinders look like this, we will then check the injectors.
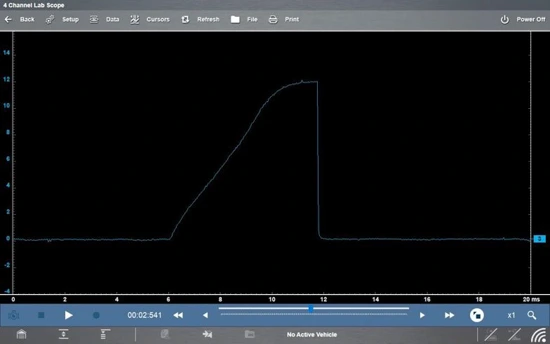
Just like the coil hook up, the guide will walk us through how to hook up the low amp probe. Again, it gives us the fuse loop option. The green trace is the amperage reading in the screenshot below. I also used the guide to help me hook up a second channel to look at the voltage on the same injector - as shown by the yellow trace. I did that to explain the difference and to further illustrate the power of amperage. And yes, that pun was intended.
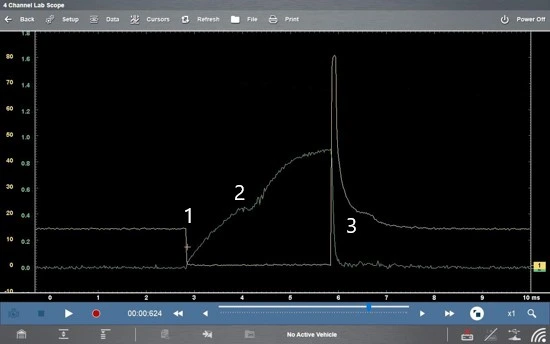
Remember that amperage is the power that does the work. Voltage moves through the circuit carrying the amperage to the injector. To say this a different way, the voltage is the vehicle that takes the worker, (amperage) to the job site (injector). It is the worker that gets the job done. In this case, pull the injector open and inject fuel.
Power is always at the injector and the ground that closes the circuit is from the PCM. It also controls when and how long the injector should open - that is the yellow trace. Number 1 on the image below indicates when that ground is sent from the PCM, commanding the injector to turn on. Note that when the ground closes the circuit that amperage, the green trace, begins to ramp up. The amperage (the worker) is building up enough to mechanically open the injector. Number 2 indicates when the injector actually opens. See where the trace bumps right there? We are seeing the work inside of the injector being done, the pintle was pulled out of its seat right there. The rest of the amperage ramp is the workers holding the injector open. Number 3 is where the PCM opens the circuit and closes the injector. When you are looking at pulse width on your scan tool, it is not the true pulse width. It is commanded pulse width, between numbers 1 and 3.
True pulse width is between 2 and 3.
Well, that’s a wrap. Oh wait, the Jeep. Let’s slap a set of plugs in it and let it go. I know in the real world we would have done that to begin with, right?
Seriously, after repairs we need to check for any necessary resets, clear codes, and run a post-scan for the customer. Skipping these final steps could result in a comeback. The only necessary reset on this Jeep for a misfire is to reset all adaptive memory shown below.

Well, I better get back to the next thing on that honey-do list.
I hope that this article has shown you the power of a good guide. It sure beats winging it doesn’t it? Also, I hope you have seen how Guided Component Tests provide high levels of efficiency, productivity, and profitability.