Advanced Driver Assistance Systems (ADAS) are now standard across most modern vehicles. Systems such as Lane Keeping Assist, Forward Collision Avoidance and Steering Intervention all rely on accurate data from a front‑mounted multi‑function camera, positioned behind the windscreen.
This camera does more than observe, it actively influences vehicle control. As a result, even small changes to vehicle geometry can significantly affect how ADAS systems behave. That’s why calibration is a safety‑critical procedure, not a finishing touch.
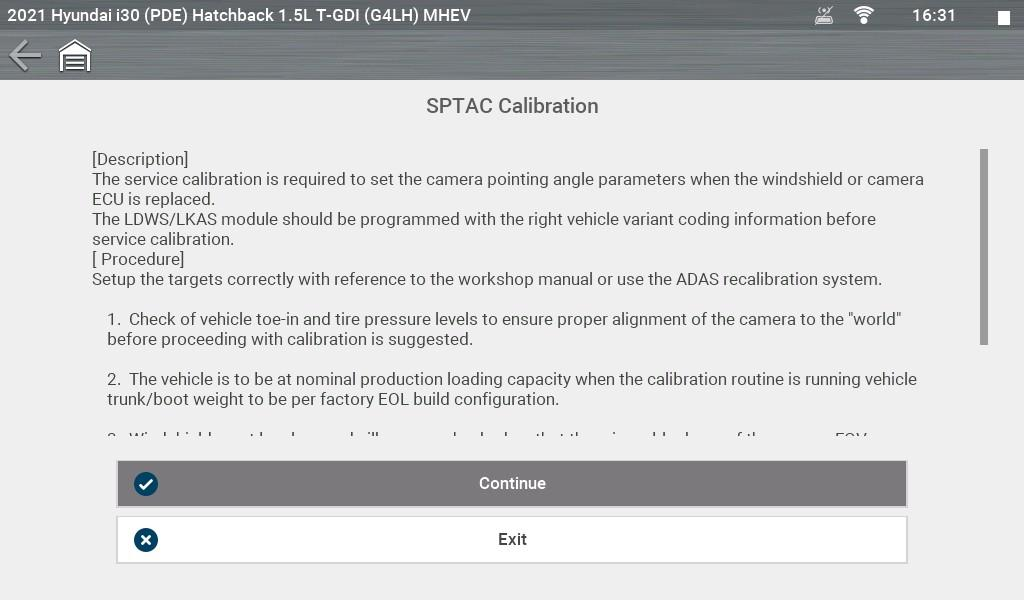
With the addition of Service Point Target Auto Calibration (SPTAC) coverage for Hyundai, Snap‑on tools allow workshops to carry out accurate, OEM‑correct calibration in‑house following routine repairs.
Understanding ADAS Camera Dependency
ADAS cameras work alongside radars, ultrasonic sensors and steering angle inputs as part of a wider sensor fusion network. The camera continuously interprets:
- Vehicle position
- Lane markings
- Road curvature
- Distance and object location
Because of this interdependence, the camera’s reference point must match the vehicle’s true centre line and thrust angle. When this relationship changes—even slightly—the system’s interpretation can be skewed.
A key point often misunderstood in workshops - No warning light does not mean no calibration is required.
Hyundai cameras allow limited self‑calibration to compensate for wear over time. Once that wear is corrected—such as during a wheel alignment—those learned values must be reset using an approved calibration routine.

When Is Camera Recalibration Required?
For the Hyundai i30 PDE, Service Point Target Auto Calibration (SPTAC) is required in the following scenarios:
- After a windscreen replacement
- After steering or suspension component replacement affecting wheel alignment
- Following a wheel alignment procedure
- When camera self‑learning tolerances need to be reset
A common assumption is that if the camera itself has not been touched, calibration is unnecessary. However, ADAS cameras interpret vehicle position based on steering angle, thrust line and chassis geometry. When alignment is corrected back to a “zero wear” condition, the camera must be recalibrated to match that reference point.
Even minor misalignment at the camera can translate into significant errors at road speed. The result may be:
- Steering assistance that “fights” the driver during cornering
- Inconsistent lane‑keeping behaviour
- Reduced confidence in ADAS features
- These concerns are often blamed on the technology itself, when the real issue is an incomplete repair process.
Creating the Right Environment
Successful ADAS calibration depends not just on the tool, but the workspace. Key considerations include:
- Adequate space for target placement
- Consistent, even lighting
- A level workshop floor
- Clear line of sight between camera and target
The SUN® EZ‑ADAS™ Recalibration System supports accurate target placement and workshop setup, helping technicians meet OEM requirements with confidence. The system’s guided workflow, combined with manufacturer‑specific targets, reduces setup errors and improves first‑time success.
For workshops regularly servicing specific vehicle makes, investing in dedicated ADAS equipment can help bring calibration work fully in‑house.

Correct Calibration Sequence Matters
Accurate ADAS calibration depends on completing each preparatory step in the correct order. Skipping or re‑sequencing steps can lead to unsuccessful calibration or, worse, systems that appear calibrated but operate incorrectly on the road.
The recommended sequence is:
1. Complete a wheel alignment to manufacturer specification
Wheel alignment is essential and must be completed before any ADAS calibration is attempted. The front camera interprets vehicle direction based on thrust angle, steering angle, and chassis geometry. If the alignment is incorrect—or carried out after calibration—the camera’s reference point will be wrong.
Using professional alignment equipment such as John Bean ensures geometry is corrected accurately and repeatably before any ADAS procedure. Proper alignment is the foundation on which all subsequent calibration steps depend.
2. Confirm vehicle condition and preparation
Ensure there is no bodywork damage, the windscreen is clean and undamaged, tyres are correctly inflated, ride height is correct, and vehicle loading meets manufacturer requirements.
3. Support the battery during the procedure
ADAS calibration places high electrical demand on the vehicle. Maintaining stable voltage throughout the process is critical.
4. Set up the ADAS calibration equipment
The SUN® EZ‑ADAS™ Recalibration System is used to physically perform the ADAS calibration. It provides the calibrated targets, positioning accuracy, and workshop setup required to meet OEM specifications.
5. Use the scan tool to complete the calibration
The Snap‑on diagnostic tool is then used to activate and control the Special Function, guiding the Service Point Target Auto Calibration (SPTAC) process, monitoring progress, and confirming successful completion.
6. Pre‑scan, road test and post‑scan
A pre‑scan confirms system status before calibration, while a post‑scan and road test verify correct operation and ensure no new issues have been introduced.
Following this sequence ensures the ADAS system is recalibrated against a correctly aligned vehicle, using the proper equipment for physical alignment (EZ‑ADAS) and the scan tool for OEM‑specific control and confirmation.
Technician Perspective: Assumptions That Lead to Errors
When technicians first encounter this situation, the natural response is often to:
This approach is risky.
Most camera calibration requirements are procedure‑driven, not fault‑driven. In many cases, recalibration is required as part of the repair process rather than being triggered by a diagnostic event.
Ignoring this step can introduce subtle but serious safety issues, including incorrect steering intervention or delayed system response. These faults are often difficult to diagnose later, as the system may operate without generating any faults or warning lights.
The key takeaway is simple: Recalibration isn’t about fixing a fault, it’s about preventing one.
System Overview: How the Camera Fits into ADAS
The front camera on the Hyundai i30 PDE is mounted on the windscreen and communicates vehicle position data to multiple modules over the CAN network. That information is used to support:
Because the camera contributes to steering decisions, incorrect calibration can have a direct impact on vehicle behaviour. Even small angular deviations at the camera can translate into significant errors at road speed.

Correct Diagnostic and Calibration Sequence
To ensure a successful calibration, the following sequence matters:
-
Wheel alignment must be completed first, with the thrust line set to manufacturer specification
-
Confirm no bodywork damage and that the windscreen is clean and in good condition
-
Verify tyre pressures, ride height, and vehicle loading conditions
-
Support the battery during the procedure where possible
-
Position the correct static calibration target accurately
-
Perform a pre‑scan
-
Carry out SPTAC calibration using the scan tool
-
Complete a road test
-
Perform a post‑scan to confirm no issues occurred
Rushing target setup, incorrect positioning, or overlooking camera cleanliness are common reasons for unsuccessful calibration attempts.
Common Pitfalls and Comebacks
When calibration procedures are skipped or performed incorrectly, common customer complaints include:
These issues are often blamed on “unnecessary technology” rather than incomplete repair procedures. In reality, they are the result of calibration steps being overlooked.
Best Practices for Long‑Term Success
Front Camera Recalibration: A Critical Step in Modern ADAS Repair
Front camera recalibration is now a core part of modern vehicle repair. On vehicles such as the Hyundai i30 PDE, ADAS systems that influence steering and braking depend on the camera accurately understanding vehicle position and direction.
Recalibration is not triggered by warning lamps. It is required whenever vehicle geometry changes, including after windscreen replacement or wheel alignment. Completing Service Point Target Auto Calibration restores the correct reference and ensures systems operate as designed.
By following the correct sequence and using SUN® EZ ADAS™ equipment alongside Snap on car diagnostic tools, workshops can carry out ADAS recalibration safely and confidently in house. Getting this right protects the workshop, the vehicle, and everyone on the road.