How to check for, download and install Service Releases using ShopStream Connect on SOLUS
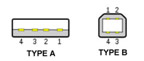
IMPORTANT: An uninterrupted power source to the diagnostic tool is crucial during an update, as any loss of power may damage the tool and render it inoperative. Therefore, use of the AC/DC Power Adapter is required. The Type A to Type B USB cable OR a ComplactFlash Card reader/writer is required for this process. If using a CF card reader/writer use the program CF card from Slot #1.
- Download and Install ShopStream Connect on your PC
- Power on the SOLUS unit
- From the main menu select Utilities (wrench icon), then Connect to PC
- Press the Y button to continue, the tool will power off.
- Press the Power button to power on the SOLUS, “SOLUS is now in CONNECT TO PC mode.” Will be displayed on the screen.
- Connect the SOLUS to the PC, Type B end to the SOLUS and Type A end to the PC
- Launch the ShopStream Connect software on the PC
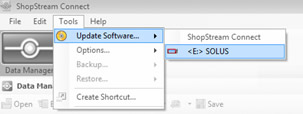
NOTE: If an update window opens automatically skip to step 11 - Access the Tools menu
- Select Update Software
- Select SOLUS from the list at the right
- When the ShopStream Connect Update Manager box appears, select Next
- If an update is found select Download
- Once the download completes select Install
- Once the install is complete, or no update is available, select Finish
- Disconnect the SOLUS from the PC
- Press the power button, the SOLUS will reboot
The SOLUS will now start to install the downloaded service update on the tool. The update is automatically installed when you power on your diagnostic tool, and is complete when the main menu displays.